
Encrypt email (S/MIME + RSA-OAEP + SHA256) in Exchange Server 2007/2010/2013/2016/2019 - Tutorial
Email Encryption protects email content from exposure to inappropriate recipients. Encrypting email doesn’t require the sender certificate but the certificate and the public key of the recipient.
For example:
sender@emailarchitect.netsends an email torcpt@emailarchitect.netwith digital signature,- The digital signature contains the public key certificate for
sender@emailarchitect.net, - Then
rcpt@emailarchitect.netcan send an email encrypted by public key of this certificate back tosender@emailarchitect.net. - Only
sender@emailarchitect.netcan read this email, because this email can ONLY be decrypted by private key ofsender@emailarchitect.net.
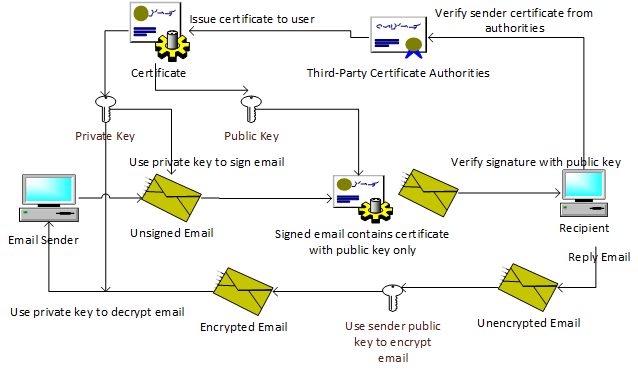
Therefore, you must receive a digital signed email from other people (Most email clients such as outlook, outlook express will add the certificate to the Other People Storage automatically once an digital signed email is received) before you can return an encrypted email to this people.
To encrypt email with EA S/MIME in your Exchange server, you need to export the recipient’s certificate first.
Encrypting email (S/MIME) in email client
Most popular email clients support email encryption. To enable email encryption in your email client, you need the certificate of the email recipient. You can refer to the documentation of your email client for the settings.
This tutorial introduces how to use S/MIME Plugin to encrypt email in Exchange Server automatically without an email client. If you send emails from an email tool that doesn’t support email encryption, this plugin can help to encrypt email on server side.
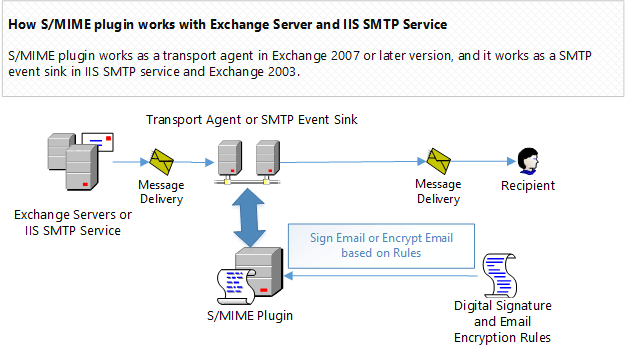
How S/MIME Plugin works?
In Exchange Server 2007/2010/2013/2016/2019, S/MIME Plugin works as a transport agent, it encrypts an email with a digital certificate based on pre-defined rules.
An encryption rule can be defined for a single recipient or multiple recipients.
Install S/MIME Plugin in Exchange Server 2007/2010/2013/2016/2019
To enable S/MIME Plugin in Exchange 2007/2010/2013/2016/2019, download the EA Disclaimer and S/MIME Installer and install it on your server.
Note
Exchange Server Role
If you installed Exchange Server 2007/2010/2013/2016/2019 on multiple servers, you need to install this plugin on every Exchange Hub Transport Server Role.
Double click installer file and the installation will be executed automatically. Installer requires Exchange server to be installed. If no Exchange server detected in your operation system, Setup will be aborted.
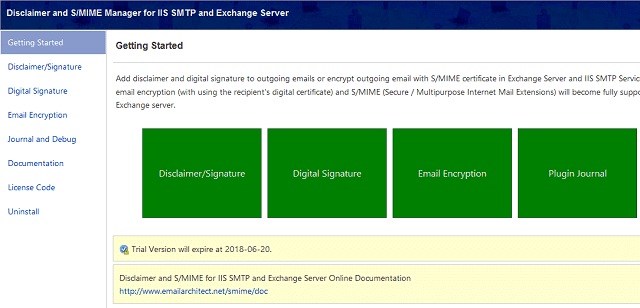
After the installation is complete, click “Disclaimer and S/MIME Manager” from “Windows Start menu” -> “All Programs” -> “EA Disclaimer and SMIME for IIS and Exchange Server” to begin the setup.
Important
After the installation is completed, you must check “Microsoft Exchange Transport Service”
and “Microsoft Exchange Mail Submission Service” in Control Panel -> Administrative Tools -> Services,
if these services are not running, start them.
Import, export and generate test certificate
To view/import/export certificate in Current User Store and Local Machine Store, you can open the Certificates MMC Snap-in like this:
- On the
Windows Start menu, clickRun, and then typemmc. Click Enter. This starts the Microsoft Management Console (MMC). - In the console, click the
Filemenu and then clickAdd/Remove Snap-in.
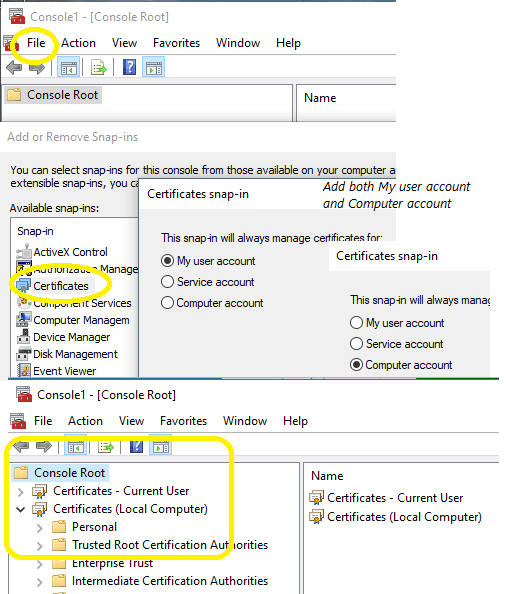
- In the
Add/Remove Snap-inwindow, click theAddbutton. - On the Snap-in list, select
Certificatesand then clickAdd. - In the Certificates Snap-in window, select
My user account, - and select
Certificatesand then clickAddagain. - In the Certificates Snap-in window, select
Computer account, and then clickNext. - In the Select Computer window, select
Local computer, and then clickFinish. This adds the Certificates Snap-in to the list. Close the window. - In the Add/Remove snap-in window, click
OK. This adds the Certificates snap-in to the mmc console. - Expand the Certificates node to see the different types of certificates.
Now you can view all certificates in current user store and local machine store.
As S/MIME Plug can’t access certificates from the Current User Store, if your certificate is stored in the Current User Store,
you must export it from the Current User Store.
Export encryption certificate from certificate store
You can export certificate from Current User Store like this:
Certificates MMC Snap-in, selectCertificates - Current User->Personal->Certificates,- If you want to export recipient’s certificate, select
Certificates - Current User->Other People->Certificates, - Select the certificate(s) you want to export, you can select multiple certificates by
Ctrl+Left Click, - Right click ->
All Tasks->Export->Next - Because encrypting email doesn’t not require private key, so please select
No, do not export the private key,
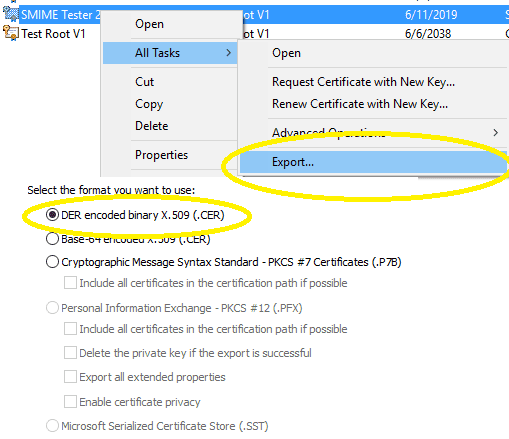
- If single certificate is selected, select
DER encoded binary X.509 (.CER), - If multiple certificates are selected, select
Microsoft Serialized Certificate Store (.SST)orPersonal Information Exchange - PKCS #12 (.PFX)->Next, - If pfx file type is selected, check
Password, and input a password as protection password, - Save it as specified file.
You can use the exported certificate file as Certificate source in S/MIME Plugin.
Note
The certificate without a private key is used for email encryption only.
Pfx, Cert and Sst file
- Pfx file can contain multiple certificates with public/private keys, it can be used for both email signing and encryption.
- Cert file is a single certificate without a private key, it is used for email encryption only.
- Sst file contains multiple certificates without a private key, it is used for email encryption only.
Import certificate to certificate store
You can import a certificate file to Certificate Machine Store like this:
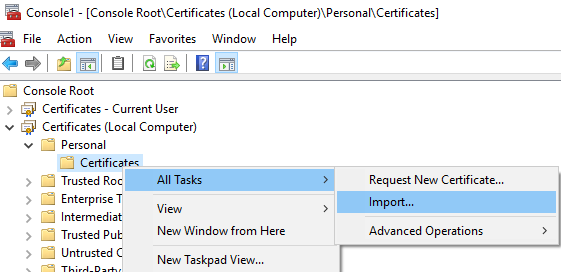
Certificates MMC Snap-in, selectCertificates - (Local Computer)->Personal->Certificates,- Right click ->
All Tasks->Import,
- Select certificate type and input certificate path ->
Next, - If it is pfx file, you should input pfx protection password and check
Mark this key as exportable ..., - Place all certificates in the following store:
Personal->Next->Finish.
After certificate file was imported to Certificate Machine Store, you can use Certificate Machine Store as Certificate source instead of certificate file.
Generate self-signed root certificate
If the email digital certificate is not issued by third-party authorities, the email client will prompt an error of “Certificate is not issued by a trusted publisher”.
However, for internal enterprise usage or test purpose,
you can create a self-signed root certificate and issue this digital certificate to internal users by New-SelfSignedCertificate PowerShell cmdlet.
Note
If you have an existing certificate from third-party authorities, you can skip this section.
Note
New-SelfSignedCertificate requires PowerShell 3.0 on Windows 10, Windows 8/8.1 and Windows Server 2012/2012 R2/2016.
You can create a root certificate like this:
New-SelfSignedCertificate -Type Custom -HashAlgorithm sha256 -KeyLength 2048 -KeyUsage CRLSign, CertSign, KeyAgreement, DataEncipherment, KeyEncipherment, DigitalSignature -KeyAlgorithm RSA -Subject "CN=Test Root V1" -CertStoreLocation "cert:\CurrentUser\My" -NotAfter (get-date).AddDays(7300)
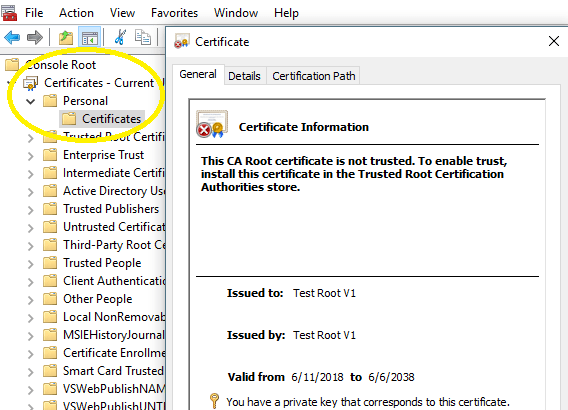
Then the new root certificate can be found in Certificates MMC Snap-in, select Certificates - Current User -> Personal -> Certificates.
Now you can issue the certificate to users from root certificate like this:
Generate email certificate issued by root certificate
Here is an example to issue the certificate from the root certificate generated in the previous section.
Set-Location -path cert:\CurrentUser\My
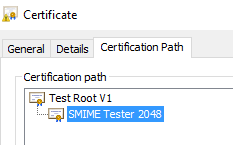
$signer = Get-Childitem -DnsName "Test Root V1"
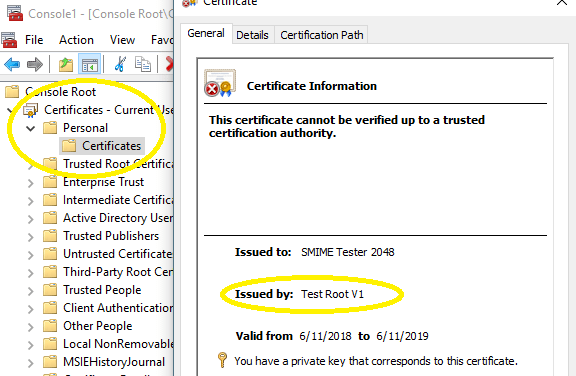
New-SelfSignedCertificate -HashAlgorithm sha256 -Type Custom -Subject "E=test@emailarchitect.net,CN=SMIME Tester 2048" -TextExtension @("2.5.29.37={text}1.3.6.1.5.5.7.3.4","2.5.29.17={text}email=test@emailarchitect.net&upn=test@emailarchitect.net") -KeyLength 2048 -KeyAlgorithm RSA -SmimeCapabilities -CertStoreLocation "Cert:\CurrentUser\My" -NotAfter (get-date).AddDays(365) -Signer $signer
Then the new email certificate can be found in Certificates MMC Snap-in, select Certificates - Current User -> Personal -> Certificates.
You can export it together with a private key as a pfx file and use it in Certificate source.
Alternatively, you can install a pfx file to Certificates (Local Computer) -> Personal -> Certificates and use Machine Store as Certificate Source.
Install root certificate to client machine
If you used the above certificate to sign emails, email client would give an error about Certificate is not issued by a trusted publisher.
You can install the root certificate to client machines like this to avoid the error.
Now you can export the root certificate to a cert file and install it on Trusted Root Certification Authorities:
Certificates MMC Snap-in, selectCertificates - Current User->Personal->Certificates,- Select the root certificate (Test Root V1),
- Right click ->
All Tasks->Export->Next - Select
No, do not export the private key,
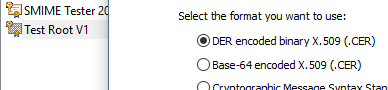
- Select
DER encoded binary X.509 (.CER), - Save it as .cer file.
Install it to Local\Computer\Trusted Root Certification Authorities
Certificates MMC Snap-in, selectCertificates - (Local Computer)->Trusted Root Certification Authorities->Certificates,- Right click ->
All Tasks->Import, - Select the .cer file from local disk ->
Next, - Place all certificates in the following store:
Trusted Root Certification Authorities->Next->Finish.
Install it to Current User\Trusted Root Certification Authorities
Certificates MMC Snap-in, selectCertificates - Current User->Trusted Root Certification Authorities->Certificates,- Right click ->
All Tasks->Import, - Select the .cer file from local disk ->
Next, - Place all certificates in the following store:
Trusted Root Certification Authorities->Next->Finish.
After you installed the root certificate to Trusted Root Certification Authorities, user certificate chain becomes valid now.
Create a rule for email encryption
Let’s create a test email encryption rule for a recipient like this:
- Click
Email Encryption->New, - Input any description for current rule,
- Input a recipient email address in
Recipient Address,
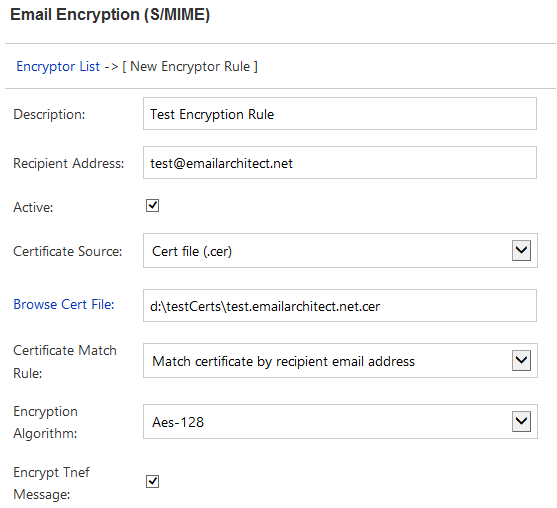
- Change
Certificate SourcetoCert file (.cer), - Input
Cert file path,
Important
IIS SMTP Service is running as Local System user, and Exchange Transport Agent is running as Network Service user,
so do not put the certificate file to Desktop or user-dependent folder,
S/MIME Plugin doesn’t have permission to read certificate files in these locations.
- Finally, click
Saveto save current rule.
After rule is saved, click Test, current rule will be executed with a virtual email message, you can find the result in test dialog box.
If Test all rules is checked, all rules defined on current machine will be executed with a virtual email message.
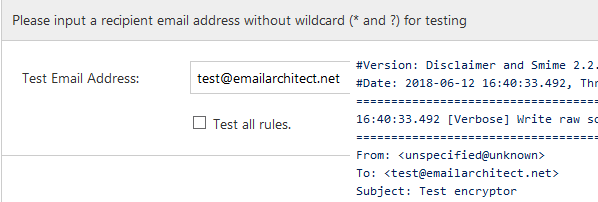
If the test result looks good, you can send a test email to that recipient, and validate if the received email was encrypted.
Recipient address pattern and wildcard
A single email address or email address with wildcard (* and ?) can be used in Recipient Address. It indicates current rule is only enabled for matched recipient address.
An encryption certificate can be only used for a specific email address. For example, you cannot use test@emailarchitect.net's certificate to
encrypt email to support@emailarchitect.net, email client would prompt an error due to address not match.
Therefore, if you used wildcard (* and ?) in recipient address, you should specify a Certificate Source that contains multiple certificates, and
set Certificate Match Rule to Match certificate by recipient email address,
to enable S/MIME Plugin to find the correct certificate to encrypt the email.
Note
If no certificate is identified for all recipients, the message won’t be encrypted.
Certificate source and certificate match Rule
Certificate source
- Certificate Machine Store
- Look up the certificate from Windows built-in certificate machine store.
- Pfx File
- Look up the certificate from specified P12/Pfx (.pfx, .p12) file.
- Sst File
- Look up the certificate from specified Sst (.sst) file.
- Cert File
- Look up the certificate from specified Cert (.cer) file.
Machine store, pfx file and sst file can contain multiple certificates, while cert file can only contain one certificate. Please refer to Import, Export and Generate Test Certificate to learn how to import/export certificate from certificate store.
Certificate match rule
- Match certificate by recipient email address
- This option is recommended. The digital certificate can be found based on recipient email address, it can be used with any certificate source.
- Specified certificate
- To use this option,
Recipient Addressshould not contain wildcard (* and ?). You can use it when the certificate subject doesn’t contain an email address.
Email encryption algorithm
Rc2, TripleDes, Aes-128, Aes-192 and Aes-256 are supported. For security reason, Aes-128, Aes-192 or Aes-256 is recommended.
AES with RSA-OAEP hash encryption padding algorithm
To comply with EDIFACT in Germany/EUROPE, please select sha256 or higher SHA algorithm in OAEP hash algorithm option and use AES-128/192/256 encryption algorithm.
Encrypt Tnef message
Tnef is an internal email format in Exchange Server. If this option is checked, Tnef messages will first be converted to RFC822/message format by S/MIME Plugin, and then be encrypted by the specified certificate.
S/MIME Plugin troubleshooting
If your email was not encrypted as expected,
you can use Log Level to generate debug log like this:
Disclaimer and S/MIME Manager->Journal;- Select
Full Debug Logand clickChange Log Level; - Send a test email, debug log file will be available in
Installation path\logfolder very soon.
Important
Please be reminded to change the log level back to “Only Error Log” after troubleshooting, otherwise the log file size will be large.
If there is no log files in log folder, you can verify the Disclaimer Plugin installation.
Installation permission
When you install S/MIME Plugin on Exchange Server 2007/2010/2013/2016/2019, please make sure you are using “Domain Administrator” to run the installer.
Verify Exchange Transport Agent installation
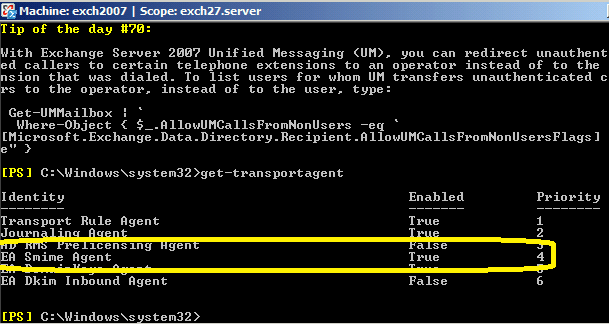
To verify S/MIME Transport Agent status, you can open Exchange Management Shell and input:
Get-TransportAgent
press enter
Check if there is EA Smime Agent installed and enabled in output.
If there is no EA Smime Agent found, you can re-run installer directly
(do not uninstall) to fix this issue.
You can also contact support@emailarchitect.net for assistance.
Appendix: Email digital signature and email disclaimer
Free Email Support
Not enough? Please contact our technical support team.
Remarks
We usually reply emails within 24hours. The reason for getting no response is likely that your SMTP server bounced our reply. In this case, please try to use another email address to contact us. Your Gmail, Hotmail or Office 365 email account is recommended.