
Add organization-wide email disclaimer or html signature with embedded images in IIS SMTP Service and Exchange 2003 - Tutorial
An email disclaimer, legal disclaimer, disclosure statement, signature, or other information can be added to the top or bottom of email messages that enter or leave your organization in IIS SMTP/Exchange Server 2003. You might be required to do this for legal, business, or regulatory requirements, to identify potentially unsafe email messages, or for other reasons that are unique to your organization.
This tutorial gives you a quick overview of how to add server-side disclaimer or html signature with embedded images to emails in IIS SMTP Service or Exchange Server 2003 based on customized rules.
Note
Organization-wide signatures are called “disclaimers,” regardless of what they include. For example, they can just be a signature, or also include your address, legal disclaimer, or other information you want.
Sections:
- How Disclaimer Plugin works?
- Install Disclaimer Plugin in IIS SMTP Service or Exchange Server 2003
- Create a simple server-side disclaimer/signature rule
- Sender group, recipient and subject conditions
- HTML disclaimer/html signature editor
- Use ADSI variables in dynamic email html disclaimer/signature
- Insert embedded image in email html disclaimer/html signature
- Use html disclaimer/html signature templates
- Insert or append disclaimer/signature intelligently
- Multiple disclaimer rules
- Disclaimer Plugin troubleshooting
- Appendix: Digital signature and email encryption
- Free Email Support
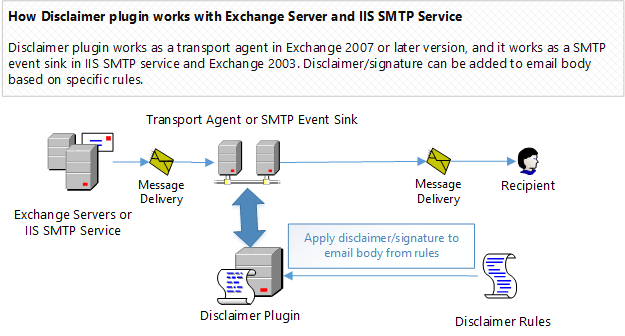
How Disclaimer Plugin works?
In IIS SMTP Service or Exchange Server 2003, Disclaimer Plugin works as a SMTP event sink, it can append/insert disclaimer or signature to email body based on specific rules.
A disclaimer/signature rule can be set for specified sender, domain, group, recipient or email subject.
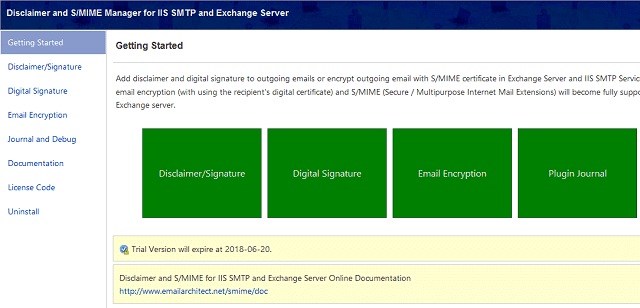
Install Disclaimer Plugin in IIS SMTP Service or Exchange Server 2003
To enable Disclaimer Plugin in IIS SMTP Service or Exchange Server 2003, download EA Disclaimer and S/MIME Installer and install it on your server.
Double click the installer file and the installation will be executed automatically. The installer requires IIS SMTP Service or Exchange Server to be installed. If no IIS SMTP Service or Exchange server detected in your operation system, Setup will be aborted.
After the installation is completed, click “Disclaimer and S/MIME Manager” from “Windows Start menu” -> “All Programs” -> “EA Disclaimer and SMIME for IIS and Exchange Server” to begin the setup.
Important
After the installation is completed, you must check “IIS Admin” and “Simple Mail Transfer Protocol (SMTP)”
in Control Panel -> Administrative Tools -> Services,
if these services are not running, start them.
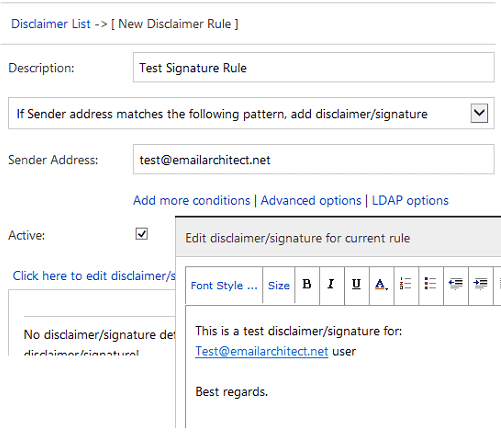
Create a simple server-side disclaimer/signature rule
You can create a test disclaimer/signature rule for a user like this:
- Click
Disclaimer/Signature->New, - Input any description for current rule,
- Input user email address in
Sender Address, - Click
Edit disclaimer/signatureto open html disclaimer/signature editor, input some text, clickOK, - Finally, click
Saveto save current rule.
After rule is saved, click Test, current rule will be executed with a virtual email message, you can find the result in test dialog box.
If Test all rules is checked, all rules defined on current machine will be executed with a virtual email message.
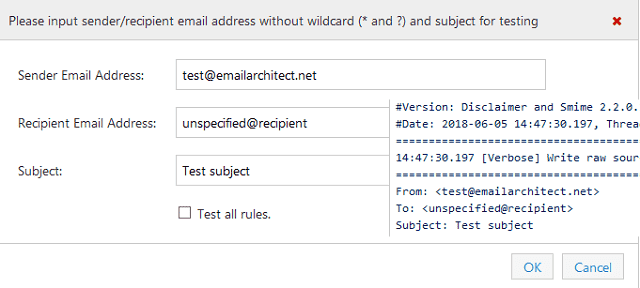
If test result looks good, you can send a test email from that user, and check if received email body has disclaimer/signature appended.
Sender address pattern and wildcard
A single email address or email address with wildcard (* and ?) can be used in Sender Address. It indicates current rule is only enabled for matched sender address.
Here are some examples:
If Sender address matches the following pattern, add disclaimer/signature
    test@emailarchitect.net

# This rule is enabled for all emails from test@emailarchitect.net
If Sender address matches the following pattern, add disclaimer/signature
    *@emailarchitect.net

# This rule is enabled for all emails from *@emailarchitect.net
If Sender address does not match the following patter, add disclaimer/signature
    test@emailarchitect.net

# This rule is enabled for all emails except test@emailarchitect.net
If Sender address does not match the following pattern, add disclaimer/signature
    *@emailarchitect.net

# This rule is enabled for all emails except *@emailarchitect.net.
Note
With wildcard (* and ?), you can define a rule for all users at domain level. Dynamic disclaimer/signature can be generated for individual users with ADSI variables and domain level rule.
To learn more details, please refer to Use ADSI variables in dynamic email html disclaimer/signature section.
Sender group, recipient and subject conditions
Besides sender address pattern, you can set additional conditions for sender group, recipient and email subject.
For example, click Add more conditions and change sender condition like this:
If Sender is from user in organization:
Above condition means current rule is just enabled for internal users, you can use ADSI variables in disclaimer.
If Sender is not from user in organization:
Above condition means current rule is just enabled for external sender, you may add some caution information in disclaimer.
If Sender is in one of group:
    IT
    Sales
Above condition means current rule is just enabled for sender that is in “IT” or “Sales” user group.
Note
In both Recipient Conditions and Subject Conditions, wildcard (* and ?) is supported.
HTML disclaimer/html signature editor
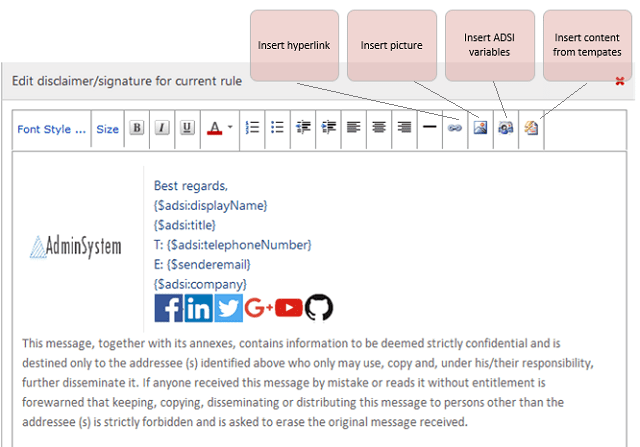
You can use html disclaimer/signature editor to change font style, size, color and etc. Moreover, it provides two advanced functions:
Use ADSI variables in dynamic email html disclaimer/signature
ADSI Variables is used to personalize dynamic disclaimer or signature by utilizing user’s Active Directory objects attribute.
To add an attribute, use this syntax: {$adsi:AttributeName}, where “AttributeName” is the attribute you want to include in the disclaimer.
Build dynamic signature with variables
To learn how to use variables, let’s create a rule is like this:
If Sender address matches the following pattern, add disclaimer/signature
    *@emailarchitect.net
The above rule is enabled for all emails from *@emailarchitect.net,
then include some ADSI variables in the disclaimer/signature like this:
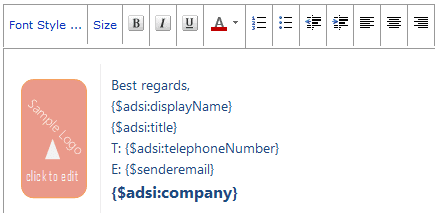
The following illustrates what email recipient see - all ADSI variables were replaced by the actual value in Active Directory User Attributes.
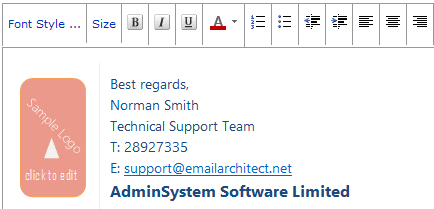
From the above example, you can see one rule can generate dynamic disclaimer/signature for individual user at domain level.
How to set active directory user attributes
Go to Administrative Tools -> Active Directory Users and Computers -> Users,
then select the user account you want to edit, right click -> Properties and edit it.
In Exchange 2010 or later version, user can edit his contact information via Exchange Server Web Access -> Options -> Account Information.

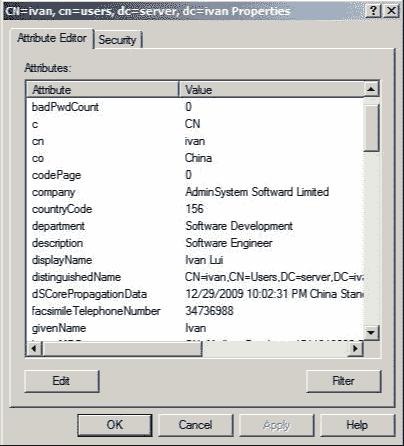
How to get attribute name
ADSI variable syntax is: {$adsi:AttributeName}.
Please note “AttributeName” is not the same as what you see in Active Directory User properties.
You need to use “ADSIEdit” tool to find out the real “AttributeName”.
Open “ADSIEdit” by Administrative Tools -> ADSI Edit, then right click -> Connect To and Click OK by default setting,
go to CN-Users node, and select one of Exchange User -> right click -> Properties.
You will see the real “AttributeName” in the first column of the following dialog:
Common ADSI variables
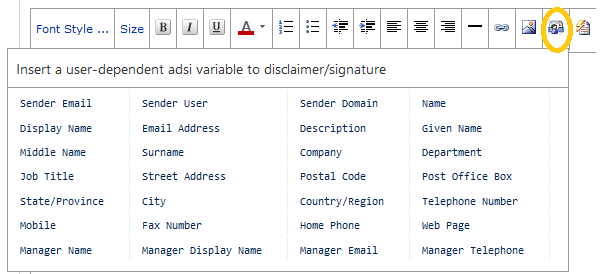
In disclaimer editor -> “Insert ADSI variable”, it lists most common active directory user attributes. You can click the attribute name to insert it into editor current position.
Skip lines which contain variables that couldn’t be updated
If the variable value wasn’t provided for a user, you can put the variable in an individual line, the line will be skipped automatically.
// for example, if your signature is like this:

{$adsi:displayName}
{$adsi:title}
{$adsi:company}

// and title is not set for the user, the signature will become

displayName
company
Or you can use {$adsi:AttributeName?alternativeValue} to set an alternative value for non-existed variable.
// for example, if your signature is like this:

{$adsi:displayName}
{$adsi:title?Engineer}
{$adsi:company}

// and title is not set for the user, the signature will become

displayName
Engineer
company
Or you can use {$^prefix $adsi:AttributeName} to skip non-existed variable and its prefix.
// for example, if your signature is like this:

{$adsi:displayName}
{$^Phone: $adsi:mobile}
{$adsi:company}

// if mobile is provided, the signature will become

displayName
Phone: 123123899
company

// and if mobile is not provided for the user, the signature will become

displayName
company
Remote ADSI LDAP options
Disclaimer Plugin queries/replaces variables from current Active Directory by default.
However, if you want to query/replace ADSI variables from a Cross Forest Domain Controller or Remote Machine,
you can specify the LDAP server address, user name and password of that server in LDAP options.
Insert embedded image in email html disclaimer/html signature
Although a remote logo/image can be used in html disclaimer/signature, by default, the image won’t be displayed due to email client security policy.
To fix it, you can add logo/image by clicking Insert image, those images will be attached as embedded attachment in an email.
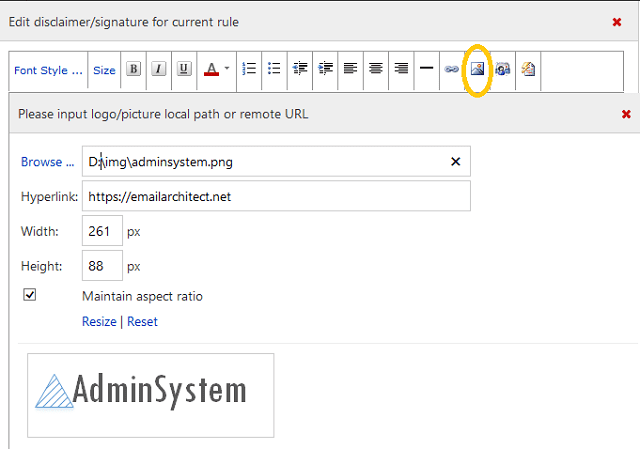
Embedded image is always displayed in email client by default.
Image location and permission
IIS SMTP Service is running as Local System user, and Exchange Transport Agent is running as Network Service user,
so do not put the image file to Desktop or user-dependent folder,
Disclaimer Plugin doesn’t have permission to read image files in these locations.
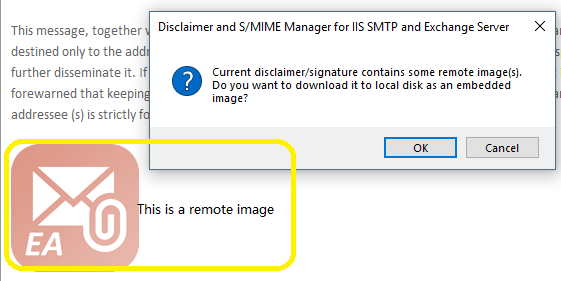
Download remote image/picture as embedded attachment
If there are some remote images in disclaimer/signature content,
the editor will prompt “Do you want to download remote image as embedded attachment?” after OK is clicked.
You can click Yes to download all remote images as embedded attachments.
Use html disclaimer/html signature templates
In disclaimer/signature editor, four Signature Layout Templates and one Confidentiality Notice are provided.
You can click Insert content from templates from the toolbar, select a template,
edit necessary variables, images, click Insert, template content will be inserted into editor.
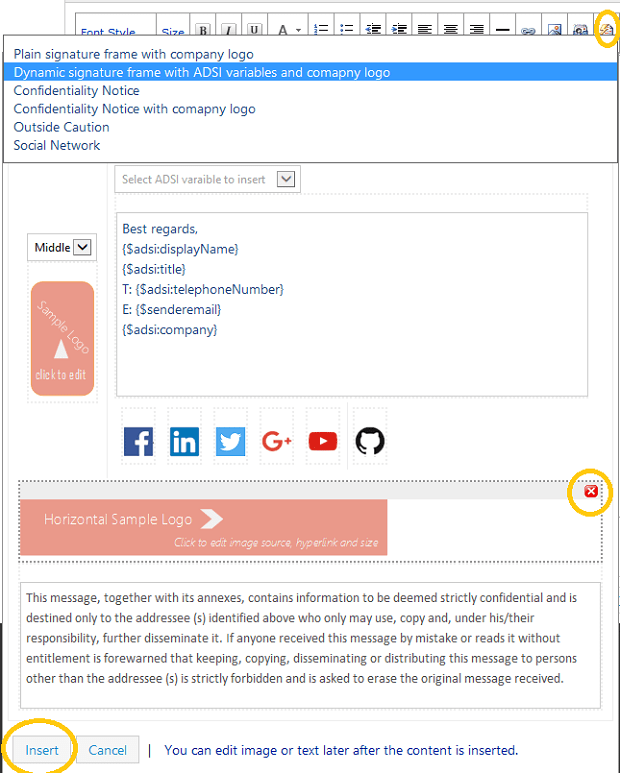
Note
After template content was inserted, you can still edit font style, size, color and etc.
Insert or append disclaimer/signature intelligently
This is a default option to specify disclaimer/signature position in email body.
It appends disclaimer/signature to the end of email body in new email. On the other hand, it inserts disclaimer/signature before original body content in replied/forwarded email.
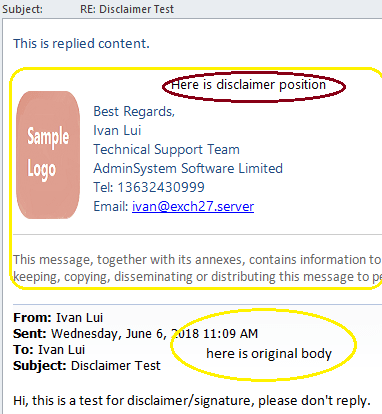
Using this option can place disclaimer/signature at better position in email body.
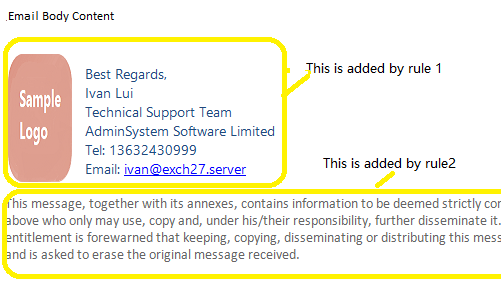
Multiple disclaimer rules
You can define multiple rules for individual user or a group.
If If current rule is applied, skip next rule is not checked in Advanced options,
all rules will be applied to the matched email based on rule priority.
For example:
# rule 1
If Sender address matches the following pattern, add disclaimer/signature
    *@exch27.server

# add personal signature for users in domain level.

#rule 2
If Sender address matches the following pattern, add disclaimer/signature
    *

# add a global Confidentiality Notice
Then the disclaimer/signature for a domain user is like this:
Disclaimer Plugin troubleshooting
If your email does not have disclaimer/signature added after you set correct rule,
you should use Log Level to generate debug log like this:
Full debug log
Disclaimer and S/MIME Manager->Journal;- Change to
Full Debug Log; - Send a test email, debug log file will be available in
Installation path\logfolder very soon.
Important
Please be reminded to change the log level back to “Only Error Log” after troubleshooting, otherwise, the log file size will be large.
Installation permission
When you install S/MIME Plugin on IIS SMTP Service or Exchange Server 2003, please make sure you are using “Domain Administrator” to run the installer.
Verify IIS SMTP Service/Exchange 2003 installation
To verify S/MIME SMTP event sink, you can open DOS prompt,
and change directory to EA Disclaimer and S/MIME installation path\installer and input:
cscript smtpregex.vbs /enum
Press enter.
Check if there is EA Smime Sink installed and enabled in output.
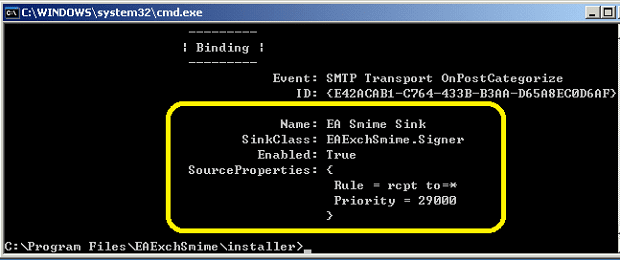
If there is no EA Smime Sink found, you can re-run installer directly
(do not uninstall) to fix this issue.
You can also contact our support team for assistance.
Appendix: Digital signature and email encryption
Free Email Support
Not enough? Please contact our technical support team.
Remarks
We usually reply emails within 24hours. The reason for getting no response is likely that your SMTP server bounced our reply. In this case, please try to use another email address to contact us. Your Gmail, Hotmail or Office 365 email account is recommended.