
Enable Sender Based Routing in Exchange Server (on-premises) 2007/2010/2013/2016/2019 - Tutorial
If you have multiple domains in your Exchange Server 2007/2010/2013/2016/2019 and need some or all of them to route through a different Send Connector, you will need to enable SBR (Sender Based Routing) in your Exchange Server.
Sender Based Routing is not supported in Exchange Server (on-premises) 2007/2010/2013/2016/2019 natively, so a custom SBR Transport agent must be configured.
This tutorial gives you a quick overview of how to set up and enable
"Sender Based Routing or Transport Rule Based Routing" in Exchange Server (on-premises) 2007/2010/2013/2016/2019.
Sender Based Routing in Exchange Server
Exchange Server doesn’t support “Sender Based Routing” natively, but you can use an Exchange Server plugin to enable this function.
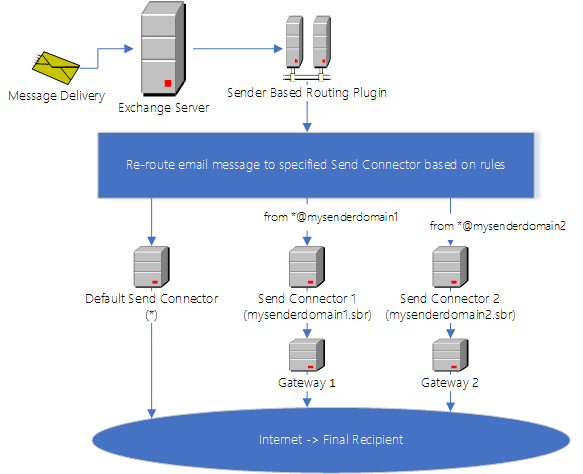
How it works:
- Install
"EA Sender Based Routing"on Exchange Server. - Create a customized
Send Connectoron Exchange Server. - Create a
Routing RuleinSender Based Routing Manager.
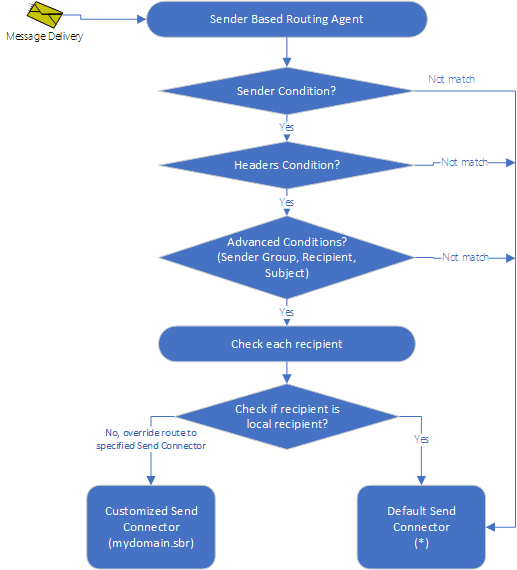
“Sender Based Routing Agent” checks if current email message matches the routing rule based on Sender, Sender Group, Recipient, Headers or Subject conditions:
- If current email message does not match the rule, skip it, the default Send Connector will handle this email message.
- If current email message matches the rule, it will re-route the email to Send Connector specified in the rule.
Sender Based Routing Plugin Installation
You can download EA Sender Based Routing for Exchange Server Installer and install it on your server.
Double click the installer file and the installation will be executed automatically. The installer requires Exchange Server 2007 SP1/2010/2013/2016/2019 to be installed. If no Exchange Server is detected in your operating system, Setup will be aborted.
After the installation is completed, click “Sender Based Routing Manager” from Windows
Start menu -> All Programs -> “EA Sender Based Routing”
to begin the setup.
Note
Installation Permission
An account with Administrative Privileges is required to run the installer for installing “Send Based Routing” on Exchange Server.
Important
After the installation is complete, I strongly suggest that you check “Microsoft Exchange Transport Service”
and “Microsoft Exchange Mail Submission Service” in Control Panel -> Administrative Tools -> Services, and check if those services are running,
if not, start them manually.
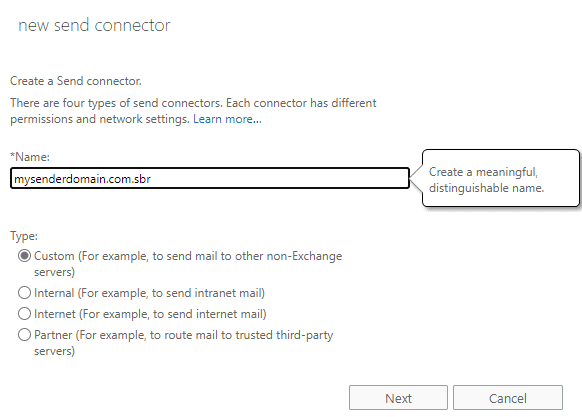
Create a New Send Connector
For example, if you want to relay all emails from domain “mysenderdomain.com”
using a specified Send Connector,
you would create a new Send Connector from the
Exchange Admin Center (https://yourserver/ecp) -> mail flow -> Send Connectors,
and name it as mysenderdomain.com.sbr.
Note
In Exchange 2007/2010, you should use Exchange Management Console ->
Organization Configuration -> Hub Transport -> Send Connectors to
create a new Send Connector.
Then select
Next, select"MX record associated with recipient domain"or"Route mail through smart hosts"based on your environment. If you selected"Route mail through smart hosts", add your smart host to the hosts list.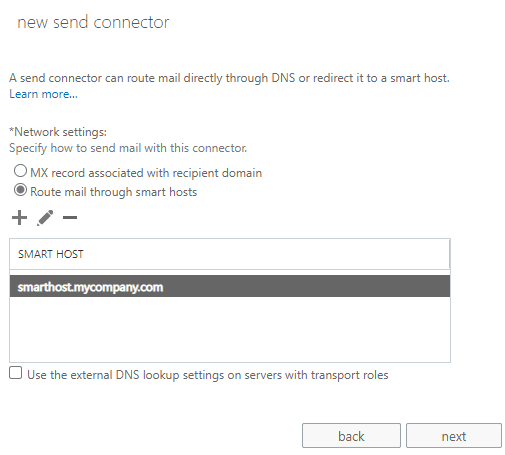
Send Connector Network Settings
Important
For Exchange Server 2007 - 2013, you must use a smart host (Route mail through smart hosts) in
this Send Connector, otherwise, your email will get SMTPSEND.DNS.NonExistentDomain error.
For Exchange 2013 SP1 - 2019, you can use either “Route mail through smart hosts” or “MX record associated with recipient domain”.
Then select
Next, if you selected"Route mail through smart hosts", set user authentication for your smart host based on your smart host requirement, default is none.If you selected
"MX record associated with recipient domain", this step is skipped.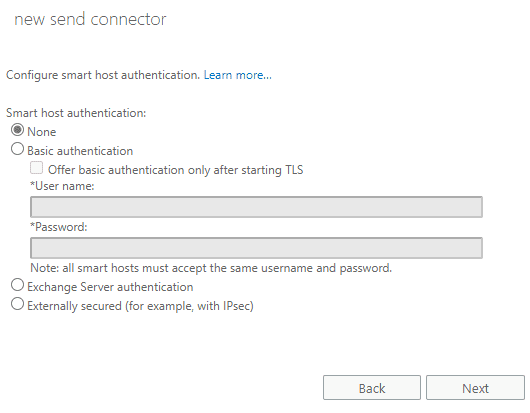
Then select
Next, click the plus sign (+), and addmysenderdomain.com.sbrinto address space, you need to input thisaddress spaceinto"Sender Based Routing Rule"at next section.Important
You should use a
virtual/non-existent domain namein address space, do not use a real domain name or *. This send connector is created for relaying message based on the routing rule, if a real domain name is used, all emails to the domain will be relayed by this send connector, no matter if the email is matched the rule.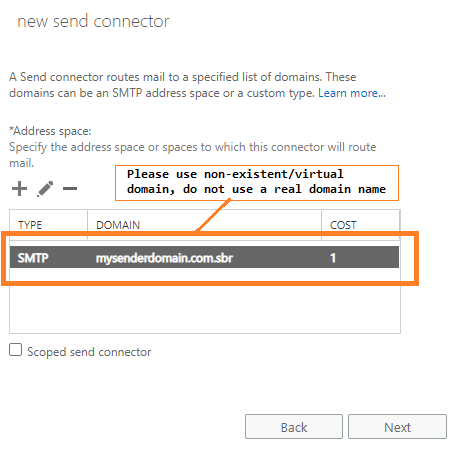
Click
Next, add your source servers and thenFinish.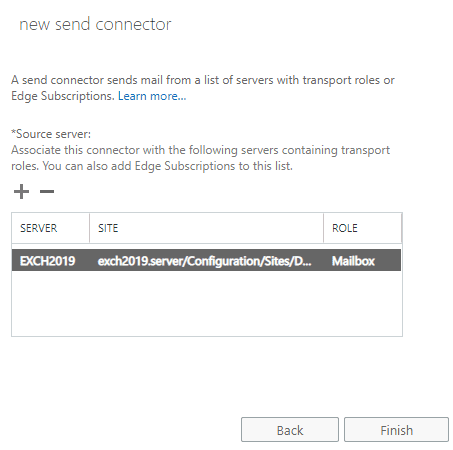
After the above Send Connector is created, we can create a routing rule to use this Send Connector.
Create a Sender Based Routing Rule
Now we need to create a rule in "Sender Based Routing Manager"
to re-route the email to the Send Connector created in previous section.
Here is how “Sender Based Routing Rule” works:
Open “Sender Based Routing Manager” from Windows Start menu ->
All Programs -> “EA Sender Based Routing”
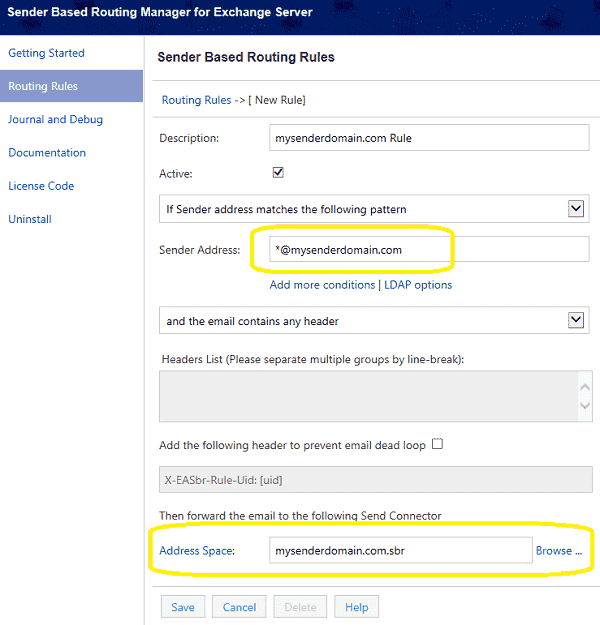
- Click
Routing Rules->New; - Input a meaningful description for this rule;
- Select
"if the sender address matches the following pattern"; - Input
*@mysenderdomain.cominSender Address, sender address supports wildcard (* and ?); - Input
mysenderdomain.com.sbrinAddress Space, this is theaddress spaceyou have added in yourSend Connector. - You can also click
Browseto select the Send Connector instead of inputting the address space directly.
Important
You should input the address space/virtual domain you have added in your send connector, not your send connector name.
Finally, click Save, after this rule is created, all emails from *@mysenderdomain.com will be relayed by
“mysenderdomain.com.sbr” Send Connector.
Moreover, you can click Address Space to open the advanced options, and
set the different connectors based on recipient address.
You can enable Full Debug Log in Sender Based Routing Manager -> Journal, then send a test email
from *@mysenderdomain.com, and check the log content to see if the rule works as expected.
Note
Sender Address supports multiple addresses or domains, you can separate domains and addresses by comma(,).
For example, you can input *@mysenderdomain1.com, *@mysenderdomain2.com.
Envelope Sender and From Address
An email has two addresses associated with sending it: the envelope sender, and the From address. The envelope sender is where computers should respond (in the case of bounce messages or errors); the From address is where people should respond.
In most cases, the envelope sender and the From address are identical.
But they aren’t same always. For example, a non-delivery report
always uses null address (<>) as the envelope sender address,
and use the postmaster address as the From address.
In SBR 1.1.0.6 or earlier version, the envelope sender is used to match the sender pattern; In later version, Both envelope sender and From address are used to match the sender pattern. Either envelope sender or From address matches the sender pattern, the email will be re-routed.
- Match either envelope sender or From address (recommended):
user@domain; - Match the envelope sender address only:
sender: user@domain; - Match the From address only:
from: user@domain. - Match the null address:
<>orsender: <>orfrom: <>.
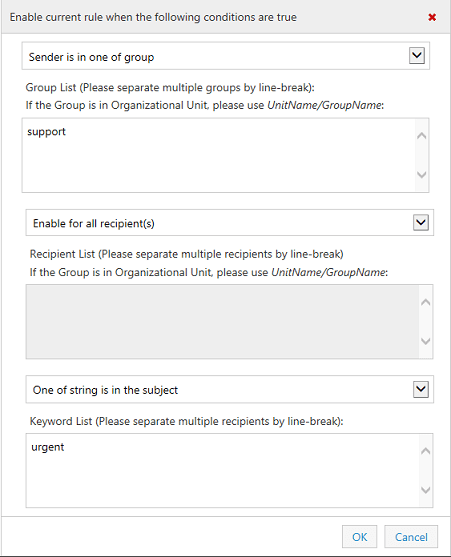
Advanced Options in Sender Based Routing Rule
Besides Sender Condition, you can also add more conditions such as Header, Sender Group,
Recipient and Subject. The email message will
be re-routed to specified Send Connector while the rule matches all conditions.
Exchange Transport Rule Based Routing and Header Conditions
If you would create more complex conditions that "Sender Based Routing Manager" doesn’t support,
you can combine Exchange built-in Transport Rule and Header Condition like this:
Open Exchange Admin Center (https://yourserver/ecp) -> mail flow -> rules
Note
In Exchange 2007/2010, you should use Exchange Management Console ->
Organization Configuration -> Hub Transport -> Transport Rules to
create a new Transport Rule.
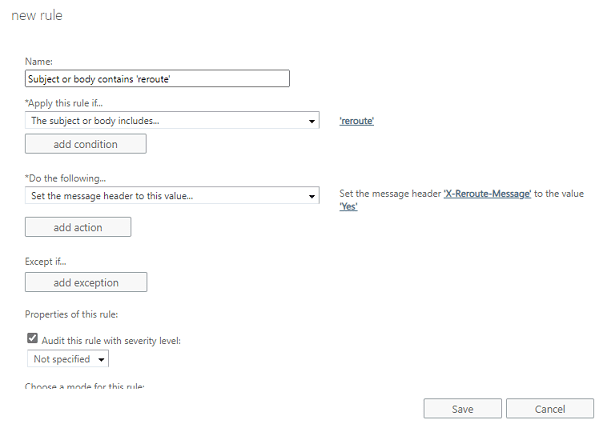
- Click plus sign and create a new rule;
- Click
"more options"; - Click
"add conditions", add the conditions you want; - In this rule, “subject or body text includes ‘reroute’ word” is added as a test condition;
- Then click
"add action"->"Modify the message properties"->"Set the message header to this value" - Header name is set to
"X-Reroute-Message", value is set to"yes" - Save this transport rule.
Then create a rule in "Sender Based Routing Manager" like this:
- Click
Routing Rules->New; - Input a meaningful description for this rule;
- Select
"if the sender address matches the following pattern"; - Input
*@mysenderdomain.cominSender Address, sender address supports wildcard (* and ?); - Select “and the email contains one of the following headers”;
- Add
X-Reroute-Message: yestoHeaders List; - Input
mysenderdomain.com.sbrinAddress Space, this is theaddress spaceyou have added in yourSend Connector.
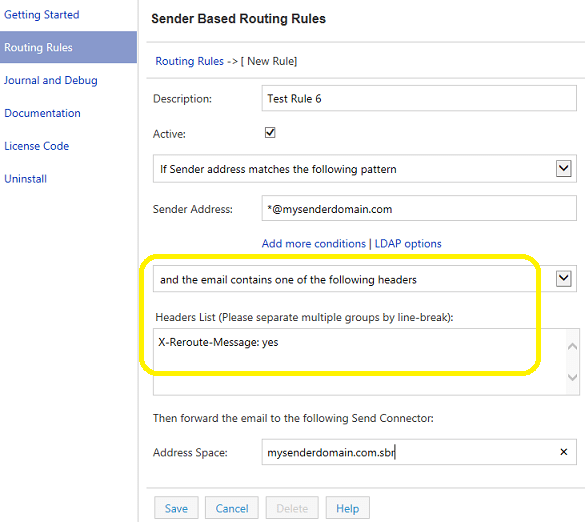
Combining with above Transport Rule and Header Conditions, the emails from *@mysenderdomain.com
with subject or body text including “reroute” will be re-routed to “mysenderdomain.com.sbr” Send Connector.
Limitation in Exchange 2007 - 2013
As I mentioned, in Exchange Server 2007 - 2013,
you should use a smart host (Route mail through smart hosts) in Customized Send Connector,
otherwise your email will get SMTPSEND.DNS.NonExistentDomain error.
Note
If your Exchange Server is 2013 SP1 or later version, you can ignore this section.
Therefore, you should consider this limitation, and create the proper Send Connector and Router Rule.
For example, if you want to relay emails like this:
- Relay all emails from
*@mysenderdomain.comby MX lookup (MX record associated with recipient domain); - Relay other emails by a smart host (
Route mail through smart hosts).
You cannot create a Customized Send Connector
to relay the emails from *@mysenderdomain.com (Because DNS MX lookup is not supported).
You should create a Customized Send Connector named "not.mysenderdomain.com.sbr",
set smart host in this Send Connector, and then set a rule like this:
- Select
"if the sender address doesn't match the following pattern"; - Input
*@mysenderdomain.cominSender Address; - Input
not.mysenderdomain.com.sbrinAddress Space.
With above settings, all emails from *@mysenderdomain.com are relayed by Default Send Connector (DNS MX lookup),
and other emails are relayed by Customized Send Connector (smart host).
Route Internal Recipient in Organization
By default, SBR doesn’t reroute the internal recipient in your organization.
If you want to reroute internal recipient,
you should specify the recipients explicitly by Add more conditions -> Recipient Condition.
For example, you want to reroute all emails to internal user, you should
select One of recipient in the list or All recipient in the list, and input *@yourdomain to the list.
Use Header Condition to Prevent Mail Dead Loop
In some cases, you need to route the email to third-party server by customized Send Connector,
after third-party server processed the email,
the email will be sent back to your server, then your server sends it by default Send Connector.
In this case, you must enable "Add the following header to prevent email dead loop" option.
It works like this:
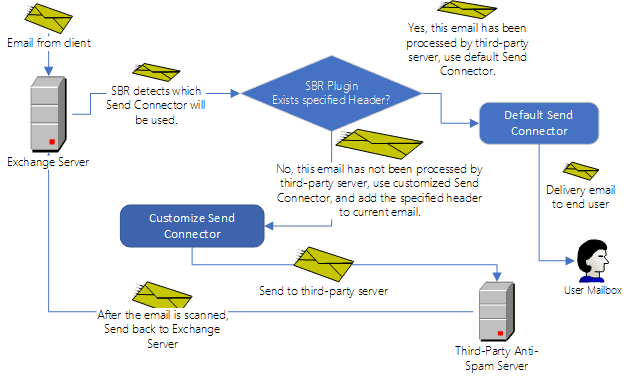
- SBR checks the inbound email, if the specified header exists, doesn’t route this email, let default Send Connector to handle it;
- If the specified header doesn’t exist, SBR added the specified header to the email, then route it to customized Send Connector.
- Because the specified header has been added for routed email, so it prevents the email rerouted at next time again.
It is recommended to use same Header on multiple servers.
There is an alternative solution:
If your third-party server adds a special header automatically after the email has been processed, then
you can select and the email doesn't contain all of the following headers in your rule, and add
the specified header to the header list. It means “if the header exists, then SBR won’t reroute the email”.
Advanced Send Connector Address Space Setting
If you want to reroute the email to multiple Send Connectors based on recipient address as well, you can add multiple address spaces in your Send Connector like this.
- Click “Address Space”;
- Set different Send Connectors for different address spaces.
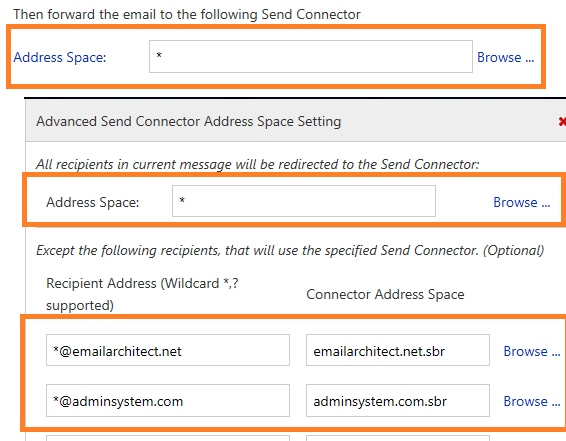
Above setting means:
- If the recipient address is
*@emailarchitect.net, then reroute the email toemailarchitect.net.sbrSend Connector; - If the recipient address is
*@adminsystem.com, then reroute the email toadminsystem.com.sbrSend Connector; - Reroute other emails to default Send Connector.
Deploy SBR on Multiple Servers
You can synchronize the configuration files on multiple servers as follows:
Install SBR on the first server, open the Sender Based Routing Manager and create routing rule(s),
then click “Open Config Folder”, find rules.json and global.json in config folder,
copy those files to Your other Exchange Servers\Sender Based Routing installation path\conf,
then all of your Exchange Servers have the same configuration.
The default installation path is: C:\Program Files (x86)\EAExchSBR.
Install Sender Based Routing Plugin on Server Core
To enable Sender Based Routing on Exchange 2019 and Server Core without desktop experience installed, you should download the Installer , and then run it under DOS command or PowerShell.
Remote desktop installation is supported, but running the installer by Windows Admin Center -> PowerShell remotely is not supported.
DOS command:
eaexchsbr.exe
PowerShell:
./eaexchsbr.exe
The installer supports silent mode, you can use the following command to start silent installation.
DOS command:
start /wait eaexchsbr.exe /S
PowerShell:
start eaexchsbr.exe -ArgumentList /S -Wait
Use Routing Manager with Server Core
If you would like to manage Routing Rules using GUI Manager, there is an alternative solution:
You can run the installer on a client machine (Windows 7 - Windows 10) without Exchange Server installed, the Plugin management tool will be installed.
After the Sender Based Routing Manager is installed, open the manager and create routing rule(s),
then click “Open Config Folder”, find rules.json and global.json in config folder,
copy those files to Your Exchange Server\Sender Based Routing installation path\conf,
then your Exchange Server has the same configuration.
The default installation path is: C:\Program Files (x86)\EAExchSBR.
Sender Based Routing Plugin Troubleshooting
If Sender Based Routing is not working properly, you can enable full debug log like this:
Full Debug Log
- Go to
Sender Based Routing Manager->Journal-> changeLog LeveltoFull Debug. - Send a test email which matches the rule.
- You can find log file in Journal shortly, check log content and see if the email was re-routed to the specified
Send Connector. - Change log level back to “Only Error” to reduce the log file size.
Verify Sender Based Routing Agent Installation
If there is no debug log generated after you enabled full debug log,
you should verify the installation of EA Sender Based Routing Agent like this:
Open Exchange Management Shell and input:
Get-TransportAgent

press enter
You will see "EA Sender Based Routing Agent" in the output.
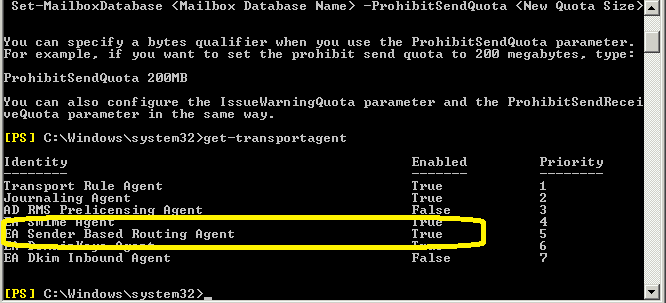
If there is no "EA Sender Based Routing Agent" in the output,
you can try to re-run the installer directly to fix
this issue, or contact our technical support team for assistance.
Restart Transport Service
If you changed your custom send connector delivery setting (smart host or DNS MX), you should restart MsExchangeTransport Service to take effect.
Restart-Service "MSExchangeTransport"
Free Email Support
Not enough? Please contact our technical support team.
Remarks
We usually reply emails within 24hours. The reason for getting no response is likely that your SMTP server bounced our reply. In this case, please try to use another email address to contact us. Your Gmail, Hotmail or Office 365 email account is recommended.