
Send Email with Queue in ASP
In previous section, I introduced how to send mass emails with multiple threads. In this section, I will introduce how to send email using EASendMail Service Queue in ASP.
Introduction
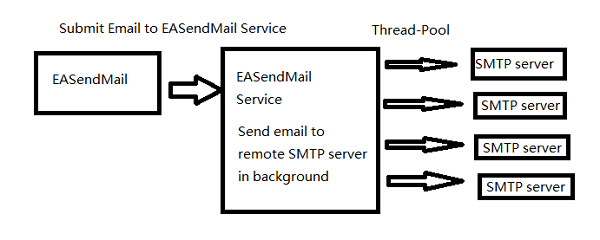
EASendMail Service is a light and fast email delivery service which works with EASendMail SMTP Component to enable your application to send mass emails in background queue service.
Along with its ability to picking recipients from database in background and sending email in specified datetime, it eases your task in developing featured email application such as newsletter application. We strongly recommend you to use EASendMail Service with your ASP/Web Application.
Important
To work with EASendMail Service, please download EASendMail and EASendMail Service at first, and then install both on your machine. If you are using web hosting service and you don’t have permission to install service on that server, EASendMail service is not suitable for you.
With EASendMail email queue feature, you do not have to code for multiple threadings. EASendMail Service can send email in background with multiple threadings automatically. You just need to adjust the maximum worker threads in EASendMail Service Manager to increase the performance. Please click here to learn more detail about EASendMail Service.
If your networking connection to your SMTP server is not very fast, EASendMail Service is absolutely solution for you. You just need to submit the email to EASendMail service queue, it is very fast because EASendMail service uses shared memory to accept email from EASendMail component, and then the service will send email in background service. It is very important to improve the response time for ASP web application.
Note
Remarks: All of samples in this section are based on first section: Send email in a simple VB 6.0 project. To compile and run the following example codes successfully, please click here to learn how to create the test project and add reference of EASendMail to your project.
[ASP Example - Send email with Queue]
The following example codes demonstrate how to send email using EASendMail Service Queue.
Note
To get the full sample projects, please refer to Samples section.
<%
Const ConnectNormal = 0
Const ConnectSSLAuto = 1
Const ConnectSTARTTLS = 2
Const ConnectDirectSSL = 3
Const ConnectTryTLS = 4

Dim oSmtp
Set oSmtp = Server.CreateObject("EASendMailObj.Mail")
oSmtp.LicenseCode = "TryIt"

' Set your sender email address
oSmtp.FromAddr = "test@emailarchitect.net"
' Add recipient email address
oSmtp.AddRecipientEx "support@emailarchitect.net", 0

' Set email subject
oSmtp.Subject = "simple email from ASP project"
' Set email body
oSmtp.BodyText = "this is a test email sent from ASP queue project, do not reply"

' Your SMTP server address
oSmtp.ServerAddr = "smtp.emailarchitect.net"

' User and password for ESMTP authentication, if your server doesn't require
' User authentication, please remove the following codes.
oSmtp.UserName = "test@emailarchitect.net"
oSmtp.Password = "testpassword"

' ConnectTryTLS means if server supports SSL/TLS connection, SSL/TLS is used automatically
oSmtp.ConnectType = ConnectTryTLS

' If your server uses 587 port
' oSmtp.ServerPort = 587

' If your server uses 25/587/465 port with SSL/TLS
' oSmtp.ConnectType = ConnectSSLAuto
' oSmtp.ServerPort = 25 ' 25 or 587 or 465

Response.Write "start to send email ..."
' You just need to change SendMail method to SendMailToQueue method in
' your ASP.NET web application, then EASendMail uses queue to send email.
' SendMailToQueue can be used in windows application as well.

If oSmtp.SendMailToQueue() = 0 Then
    Response.Write "email was sent to queue successfully!"
Else
    Response.Write "failed to send email with the following error:" & oSmtp.GetLastErrDescription()
End If
%>
Next Section
At next section I will introduce how to send mass emails with EASendMail Service Database Queue in ASP.
Appendix
- EASendMail SMTP Component SDK
- Process Bounced Email (Non-Delivery Report) and Email Tracking
- Bulk Email Sender Guidelines
- Work with Email Queue
- Registration-free COM/ActiveX with Manifest File (Distribution)
Comments
If you have any comments or questions about above example codes, please click here to add your comments.