C#/ASP.NET/ASP MVC - Send email using Microsoft OAuth 2.0 (Modern Authentication) from Hotmail/Outlook account
You can send email using traditional user/password SMTP authentication from personal Hotmail/Outlook account.
However Microsoft will disable traditional user authentication in the future, switching to Microsoft OAuth (Modern Authentication) is strongly recommended now.
Sections:
- Installation
- Add reference
- .NET assembly
- Create your application in Azure Portal
- Register application
- Single tenant and multitenant in account type
- Assign API permission
- EWS API permission
- Authentication and redirect uri
- Client Id and client secrets
- Branding and verify publisher
- Client id and tenant
- Enable TLS Strong Encryption Algorithms in .NET 2.0 and .NET 4.0
- Use client id and client secret to request access token
- Access token expiration and refresh token
- C# - Send email using Microsoft OAuth + Hotmail/Outlook/Live SMTP server
- C# - Send email using Microsoft OAuth + Hotmail/Outlook Live SMTP server in ASP.NET/ASP MVC
- TLS 1.2 protocol
- EA Oauth Service for Office 365
- Related links
Installation
Before you can use the following codes, please download EASendMail SMTP Component and install it on your machine at first. Full sample proejcts are included in this installer.
Install from NuGet
You can also install the run-time assembly by NuGet. Run the following command in the NuGet Package Manager Console:
Install-Package EASendMail
Note
If you install it by NuGet, no sample projects are installed, only .NET assembly is installed. And you also need to get a trial license code from here instead of using “TryIt”.
Add reference
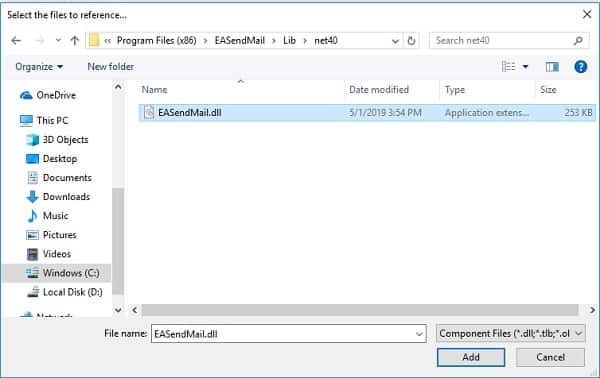
To use EASendMail SMTP Component in your project, the first step is Add reference
of EASendMail to your project. Please create or open your project with Visual Studio,
then go to menu -> Project -> Add Reference -> .NET -> Browse..., and select
Installation Path\Lib\net[version]\EASendMail.dll from your disk, click Open -> OK, the reference of EASendMail
will be added to your project, and you can start to use it to send email
in your project.
.NET assembly
Because EASendMail has separate builds for .Net Framework, please refer to the following table and choose the correct dll.
Separate builds of run-time assembly for .NET Framework 2.0, 3.5, 4.0, 4.5, 4.6.1, 4.7.2, 4.8.1, .NET 6.0, .NET 7.0, .NET 8.0, .NET Standard 2.0 and .NET Compact Framework 2.0, 3.5.
| File | .NET Framework Version |
| Lib\[net20|40|45|461|472|481]\EASendMail.dll |
Built with .NET Framework 2.0, 4.0, 4.5, 4.6.1, 4.7.2, 4.8.1
It requires .NET Framework 2.0, 3.5 or later version. |
| Lib\[net6.0|7.0|8.0]\EASendMail.dll |
Built with .NET 6.0, .NET 7.0, .NET 8.0
It requires .NET 6.0 or later version. |
| Lib\netstandard2.0\EASendMail.dll |
Built with .NET Standard 2.0
It requires .NET Standard 2.0 or later version. |
| Lib\[net20-cf|net35-cf]\EASendMail.dll |
Built with .NET Compact Framework 2.0, 3.5
It requires .NET Compact Framework 2.0, 3.5 or later version. |
Create your application in Azure Portal
To use Microsoft/Office365/Live OAuth (Modern Authentication) in your application, you must create a application in Azure Portal.
- Sign in to the
Azure portalusing either a work or school account or a personal Microsoft account. - If your account gives you access to more than one tenant, select your account in the top right corner,
and set your portal session to the
Azure AD tenantthat you want.
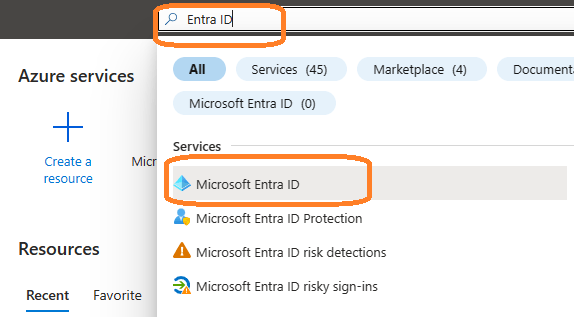
Search Microsoft Entra ID (old name “Azure Active Directory”) and go to this service:
Register application
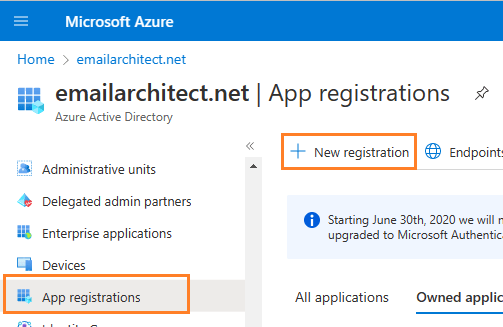
In the left-hand navigation pane, select the Microsoft Entra ID service, and then select -> Manage -> App registrations -> New registration.
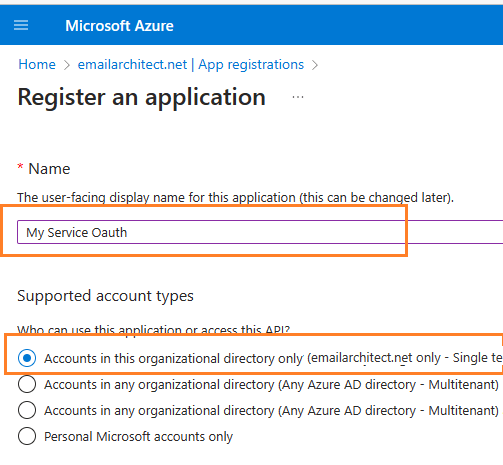
Input a name to to register the application:
Single tenant and multitenant in account type
When the register an application page appears, enter a meaningful application name and select the account type.
Select which accounts you would like your application to support.
- If your application only supports the users in your directory or organization, please select
Single tenanttype; - If your application needs to support all users in Office 365 and Microsoft personal account (hotmail.com, outlook.com),
please select
Multitenanttype, and you must verify publisher.
Because we want to support all Office 365 and
LIVE SDK (hotmail, outlook personal account), so select
Accounts in any organizational directory and personal Microsoft accounts.
Important
If you don’t verify publisher for multitenant application, your application will not request access token successfully.
Assign API permission
Now you need to assign API permission to the application by clicking Manage -> API Permission -> Add a permission.
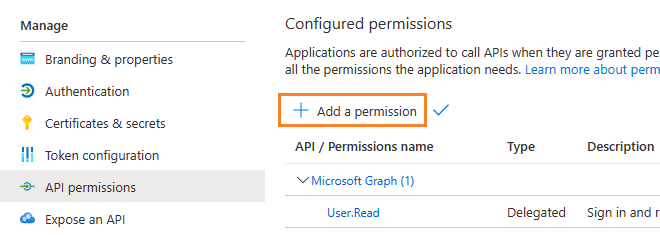
You don’t have to assign all the API permissions below to the application, just assign the API permission(s) you need.
| Protocol | Permission | Scope | |
| Graph API | Mail.Send, Mail.ReadWrite | https://graph.microsoft.com/Mail.Send, https://graph.microsoft.com/Mail.ReadWrite | |
| EWS | EWS.AccessAsUser.All | https://outlook.office.com/EWS.AccessAsUser.All | |
| SMTP | SMTP.Send | https://outlook.office365.com/SMTP.Send | |
| POP | POP.AccessAsUser.All | https://outlook.office365.com/POP.AccessAsUser.All | |
| IMAP | IMAP.AccessAsUser.All | https://outlook.office365.com/IMAP.AccessAsUser.All |
Now we need to add permission to the application:
- Click
Manage->API Permission-> Add a permission->Microsoft Graph->Delegated Permission->User.Read,email,offline_access,openid,profile,SMTP.Send,IMAP.AccessAsUser.All,POP.AccessAsUser.All,Mail.Send,Mail.ReadWrite.
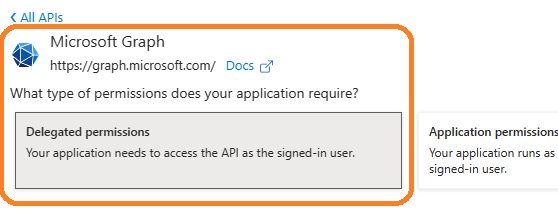
EWS API permission
With the above permissions, your application can support SMTP, POP, IMAP and Ms Graph API service. If your application needs to support EWS protocol either, add EWS permission like this:
- Click
Manage->API Permission-> Add a permission->APIs in my organization uses->Office 365 Exchange Online->Delegated Permission->Check EWS.AccessAsUser.All

Here is permissions list:
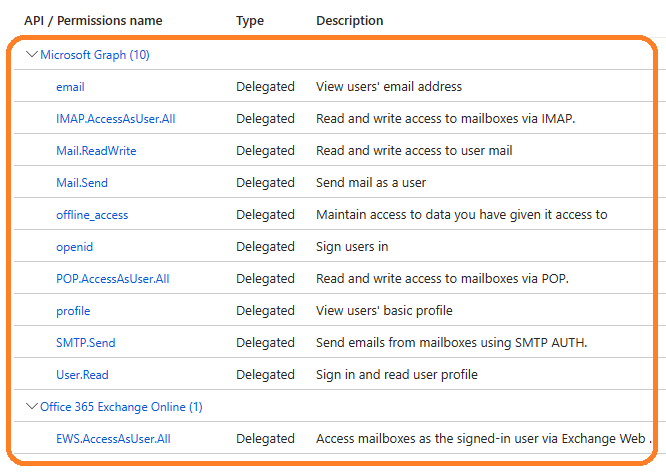
Authentication and redirect uri
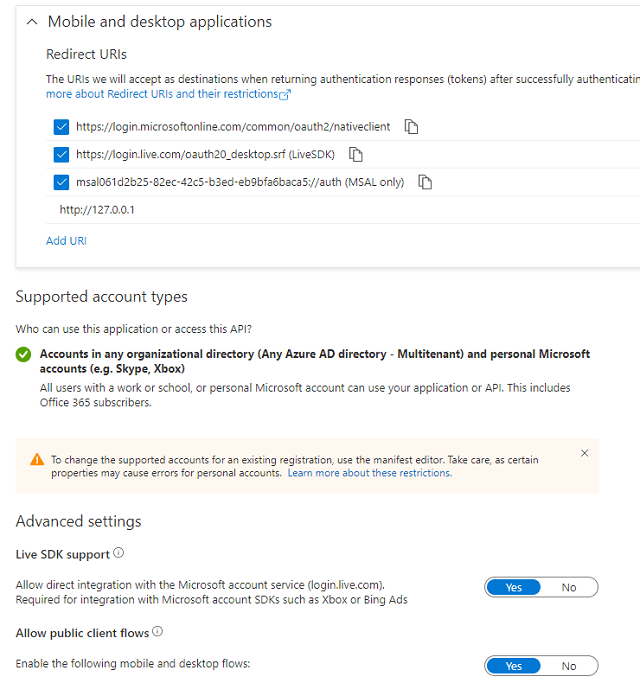
Because the example code is based on desktop application, so add Redirect Uri like this:
Click
Manage->"Authentication"->Add a platform->Mobile and desktop applications->Redirect Uri, please check or add the following URI.https://login.microsoftonline.com/common/oauth2/nativeclient https://login.microsoftonline.com/common/oauth2/nativeclient http://127.0.0.1
Note
https://login.microsoftonline.com/common/oauth2/nativeclientis used for Live SDK,http://127.0.0.1is used for local Http Listener.
If your application needs to support Microsoft personal account, set both
"Live SDK Support"and"Treat application as a public client"to"Yes".
Client Id and client secrets
Now we need to create a client secret for the application,
click Manage -> Certificates and secrets -> client secrets and add a new client secret.

After client secret is created, store the client secret value to somewhere.
Important
Please store client secret value by yourself, because it is hidden when you view it at next time.
Branding and verify publisher
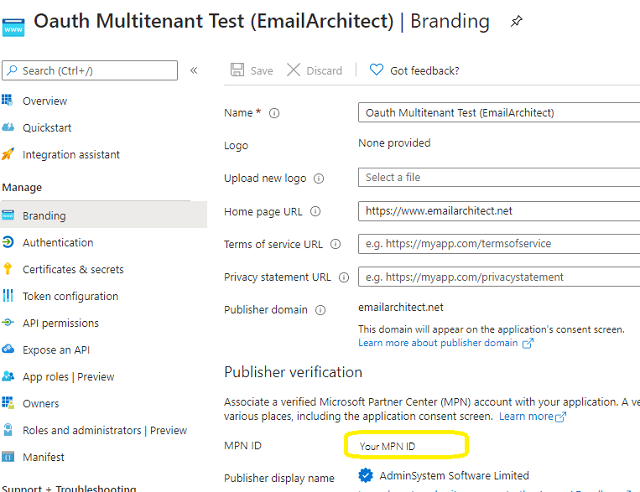
Now we click Branding, you can edit your company logo, URL and application name. If your application supports
multitenant (access user in all Office 365 and Microsoft personal account), you must complete the publisher verification.
It is not difficult, you can have a look at publisher verification. After publisher verification is completed, your branding is like this:
Important
You must complete the publisher verification for multitenant application, otherwise, your application will not request access token correctly.
Client id and tenant
Now you can click Overview to find your client id and tenant.

- If your application is
single tenant, use the tenant value intokenUriandauthUriinstead ofcommon. - If your application is
multitenant, usecommonas tenant.
Above client id and client secret support both "Office365 + SMTP/EWS" and
"Live (hotmail, outlook personal account) + SMTP".
Enable TLS Strong Encryption Algorithms in .NET 2.0 and .NET 4.0
Because HttpWebRequest is used to get access token from web service.
If you’re using .NET framework (.NET 2.0 - 3.5 and .NET 4.x),
you need to enable Strong Encryption Algorithms to request access token:
Put the following content to a file named NetStrongEncrypt.reg, right-click this file -> Merge -> Yes.
You can also download it from https://www.emailarchitect.net/webapp/download/NetStrongEncrypt.zip.
Windows Registry Editor Version 5.00

[HKEY_LOCAL_MACHINE\SOFTWARE\Microsoft\.NETFramework\v2.0.50727]
"SystemDefaultTlsVersions"=dword:00000001
"SchUseStrongCrypto"=dword:00000001

[HKEY_LOCAL_MACHINE\SOFTWARE\Wow6432Node\Microsoft\.NETFramework\v2.0.50727]
"SystemDefaultTlsVersions"=dword:00000001
"SchUseStrongCrypto"=dword:00000001

[HKEY_LOCAL_MACHINE\SOFTWARE\Microsoft\.NETFramework\v4.0.30319]
"SystemDefaultTlsVersions"=dword:00000001
"SchUseStrongCrypto"=dword:00000001

[HKEY_LOCAL_MACHINE\SOFTWARE\Wow6432Node\Microsoft\.NETFramework\v4.0.30319]
"SystemDefaultTlsVersions"=dword:00000001
"SchUseStrongCrypto"=dword:00000001
Use client id and client secret to request access token
You can use client id and client secret to get the user email address and access token like this:
- Your application uses a web browser/browser control to open Oauth Url;
- User inputs user and password in web authentication page, and then the Oauth server returns access token back to your application;
- Your application uses access token to access resource on the server.
- You can find full example codes in
EASendMail Installation Path\Samples_{Programming language/Developer Tool}\Oauthproject.
Access token expiration and refresh token
You don’t have to open browser to request access token every time. By default,
access token expiration time is 3600 seconds, you can use the access token repeatedly before it is expired.
After it is expired, you can use refresh token to refresh access token directly without opening browser.
You can find full sample project in EASendMail installation path to learn how to refresh token.
Important
You should create your client id and client secret, do not use the client id from example codes in production environment,
it is used for test purpose. If you got "This app isn't verified" information, please click "Advanced" -> Go to ... for test.
C# - Send email using Microsoft OAuth + Hotmail/Outlook/Live SMTP server
Here is a console application which demonstrates how to use Microsoft OAuth to do user authentication and send email.
Note
This sample cannot handle the event of Web Browser is closed by user manually before authentication is completed.
You can refer to the better sample project which uses Web Browser Control in EASendMail installation path.
using System;
using System.IO;
using System.Net;
using System.Net.Sockets;
using System.Text;
using System.Threading.Tasks;
using System.Runtime.InteropServices;
using EASendMail;

namespace EASendMailKbCSharp
{
    class Program
    {
        static void Main(string[] args)
        {
            Console.WriteLine("+------------------------------------------------------------------+");
            Console.WriteLine("  Sign in with MS OAuth                                             ");
            Console.WriteLine("   If you got \"This app isn't verified\" information in Web Browser, ");
            Console.WriteLine("   click \"Advanced\" -> Go to ... to continue test.");
            Console.WriteLine("+------------------------------------------------------------------+");
            Console.WriteLine("");
            Console.WriteLine("Press any key to sign in...");
            Console.ReadKey();

            try
            {
                Program p = new Program();
                p.DoOauthAndSendEmail();
            }
            catch (Exception ep)
            {
                Console.WriteLine(ep.ToString());
            }
            Console.ReadKey();
        }

        void SendMailWithXOAUTH2(string userEmail, string accessToken)
        {
            // Hotmail/Outlook/Live SMTP server address
            SmtpServer oServer = new SmtpServer("smtp.office365.com");
            // enable SSL connection
            oServer.ConnectType = SmtpConnectType.ConnectSSLAuto;
            // Using 587 port, you can also use 465 port
            oServer.Port = 587;

            // use SMTP OAUTH 2.0 authentication
            oServer.AuthType = SmtpAuthType.XOAUTH2;
            // set user authentication
            oServer.User = userEmail;
            // use access token as password
            oServer.Password = accessToken;

            SmtpMail oMail = new SmtpMail("TryIt");
            // Your email address
            oMail.From = userEmail;

            // Please change recipient address to yours for test
            oMail.To = "support@emailarchitect.net";

            oMail.Subject = "test email from Hotmail account with OAUTH 2";
            oMail.TextBody = "this is a test email sent from c# project with Hotmail.";

            Console.WriteLine("start to send email using OAUTH 2.0 ...");

            SmtpClient oSmtp = new SmtpClient();
            oSmtp.SendMail(oServer, oMail);

            Console.WriteLine("The email has been submitted to server successfully!");
        }

        // client configuration
        // You should create your client id and client secret,
        // do not use the following client id in production environment, it is used for test purpose only.
        const string clientID = "eccbabb2-3377-4265-85c1-ea2fb515f075";
        const string clientSecret = "QaR_RR:-5WqTY[nni9pdBr9xVybqrAu4";
        const string scope = "https://outlook.office.com/SMTP.Send%20offline_access%20email%20openid";
        const string authUri = "https://login.microsoftonline.com/common/oauth2/v2.0/authorize";
        const string tokenUri = "https://login.microsoftonline.com/common/oauth2/v2.0/token";

        static int GetRandomUnusedPort()
        {
            var listener = new TcpListener(IPAddress.Loopback, 0);
            listener.Start();
            var port = ((IPEndPoint)listener.LocalEndpoint).Port;
            listener.Stop();
            return port;
        }

        async void DoOauthAndSendEmail()
        {
            // Creates a redirect URI using an available port on the loopback address.
            string redirectUri = string.Format("http://127.0.0.1:{0}/", GetRandomUnusedPort());
            Console.WriteLine("redirect URI: " + redirectUri);

            // Creates an HttpListener to listen for requests on that redirect URI.
            var http = new HttpListener();
            http.Prefixes.Add(redirectUri);
            Console.WriteLine("Listening ...");
            http.Start();

            // Creates code challenge for Oauth PKCE.
            OAuthCodeChallenge challenge = new OAuthCodeChallenge();
            var codeChallenge = challenge.Challenge;
            var codeVerifier = challenge.Verifier;
            var challengeMethod = challenge.ChallengeMethod;

            // Creates the OAuth 2.0 authorization request.
            string authorizationRequest = string.Format("{0}?response_type=code&scope={1}&redirect_uri={2}&client_id={3}&prompt=login",
                authUri,
                scope,
                Uri.EscapeDataString(redirectUri),
                clientID
            );

            // append code_challenge and code_challenge_method for OAUTH PKCE.
            authorizationRequest +=
                string.Format("&code_challenge={0}&code_challenge_method={1}", codeChallenge, challengeMethod);

            // Opens request in the browser.
            System.Diagnostics.Process.Start(
                new System.Diagnostics.ProcessStartInfo(authorizationRequest) { UseShellExecute = true }
                );

            // Waits for the OAuth authorization response.
            var context = await http.GetContextAsync();

            // Brings the Console to Focus.
            BringConsoleToFront();

            // Sends an HTTP response to the browser.
            var response = context.Response;
            response.ContentType = "text/html";
            response.AddHeader("Connection", "close");

            string responseString = string.Format("<html><head></head><body>Please return to the app and close current window.</body></html>");
            var buffer = Encoding.UTF8.GetBytes(responseString);
            response.ContentLength64 = buffer.Length;
            var responseOutput = response.OutputStream;
            Task responseTask = responseOutput.WriteAsync(buffer, 0, buffer.Length).ContinueWith((task) =>
            {
                responseOutput.Close();
                http.Stop();
                Console.WriteLine("HTTP server stopped.");
            });

            // Checks for errors.
            if (context.Request.QueryString.Get("error") != null)
            {
                Console.WriteLine(string.Format("OAuth authorization error: {0}.", context.Request.QueryString.Get("error")));
                return;
            }

            if (context.Request.QueryString.Get("code") == null)
            {
                Console.WriteLine("Malformed authorization response. " + context.Request.QueryString);
                return;
            }

            // extracts the code
            var code = context.Request.QueryString.Get("code");
            Console.WriteLine("Authorization code: " + code);

            string responseText = await RequestAccessToken(code, codeVerifier, redirectUri);
            Console.WriteLine(responseText);

            OAuthResponseParser parser = new OAuthResponseParser();
            parser.Load(responseText);

            var user = parser.EmailInIdToken;
            var accessToken = parser.AccessToken;

            Console.WriteLine("User: {0}", user);
            Console.WriteLine("AccessToken: {0}", accessToken);

            SendMailWithXOAUTH2(user, accessToken);
        }

        async Task<string> RequestAccessToken(string code, string codeVerifier, string redirectUri)
        {
            Console.WriteLine("Exchanging code for tokens...");

            // builds the  request
            string tokenRequestBody = string.Format("code={0}&redirect_uri={1}&client_id={2}&grant_type=authorization_code",
                code,
                Uri.EscapeDataString(redirectUri),
                clientID
                );
            // if you use it in web application, please add clientSecret parameter
            /* string tokenRequestBody = string.Format("code={0}&redirect_uri={1}&client_id={2}&client_secret={3}&grant_type=authorization_code",
                code,
                Uri.EscapeDataString(redirectUri),
                clientID,
                clientSecret
                );
            */

            // append code_verifier for OAUTH PKCE.
            tokenRequestBody += string.Format("&code_verifier={0}", codeVerifier);

            // sends the request
            HttpWebRequest tokenRequest = (HttpWebRequest)WebRequest.Create(tokenUri);
            tokenRequest.Method = "POST";
            tokenRequest.ContentType = "application/x-www-form-urlencoded";
            tokenRequest.Accept = "Accept=text/html,application/xhtml+xml,application/xml;q=0.9,*/*;q=0.8";

            byte[] _byteVersion = Encoding.ASCII.GetBytes(tokenRequestBody);
            tokenRequest.ContentLength = _byteVersion.Length;

            Stream stream = tokenRequest.GetRequestStream();
            await stream.WriteAsync(_byteVersion, 0, _byteVersion.Length);
            stream.Close();

            try
            {
                // gets the response
                WebResponse tokenResponse = await tokenRequest.GetResponseAsync();
                using (StreamReader reader = new StreamReader(tokenResponse.GetResponseStream()))
                {
                    // reads response body
                    return await reader.ReadToEndAsync();
                }

            }
            catch (WebException ex)
            {
                if (ex.Status == WebExceptionStatus.ProtocolError)
                {
                    var response = ex.Response as HttpWebResponse;
                    if (response != null)
                    {
                        Console.WriteLine("HTTP: " + response.StatusCode);
                        using (StreamReader reader = new StreamReader(response.GetResponseStream()))
                        {
                            // reads response body
                            string responseText = await reader.ReadToEndAsync();
                            Console.WriteLine(responseText);
                        }
                    }
                }

                throw;
            }
        }

        // Hack to bring the Console window to front.

        [DllImport("kernel32.dll", ExactSpelling = true)]
        public static extern IntPtr GetConsoleWindow();

        [DllImport("user32.dll")]
        [return: MarshalAs(UnmanagedType.Bool)]
        public static extern bool SetForegroundWindow(IntPtr hWnd);

        public void BringConsoleToFront()
        {
            SetForegroundWindow(GetConsoleWindow());
        }
    }
}
C# - Send email using Microsoft OAuth + Hotmail/Outlook Live SMTP server in ASP.NET/ASP MVC
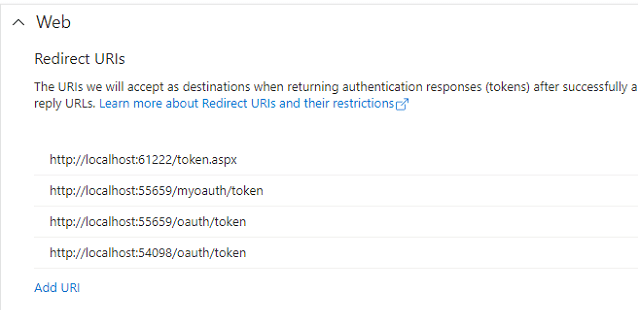
If you use Microsoft OAuth in ASP.NET/ASP MVC application, you should use a ASP.NET/ASP MVC page to
get authorization code instead of HttpListener. You need to add your ASP.NET/ASP MVC page path
to Authentication -> add a platform -> web -> Redirect URIs in your Azure application.
// if you use it in web application, please add clientSecret parameter
string tokenRequestBody = string.Format("code={0}&redirect_uri={1}&client_id={2}&client_secret={3}&grant_type=authorization_code",
    code,
    Uri.EscapeDataString(redirectUri),
    clientID,
    clientSecret
    );
// Please add http://localhost:54098/oauth/token to Authorized redirect URIs in your Google/MS Azure project.
public ActionResult Token(string code)
{
    // code parameter is the authorization code returned by Microsoft OAuth server,
    // then you can use it to request AccessToken
    // just like RequestAccessToken method in previous example
}
You can find a full sample project in EASendMail installation path\Samples_ASPNetMvc.
TLS 1.2 protocol
TLS is the successor of SSL, more and more SMTP servers require TLS 1.2 encryption now.
If your operating system is Windows XP/Vista/Windows 7/Windows 2003/2008/2008 R2/2012/2012 R2, you need to
enable TLS 1.2 protocol in your operating system like this:
Enable TLS 1.2 on Windows XP/Vista/7/10/Windows 2008/2008 R2/2012
EA Oauth Service for Office 365
If you are not the tenant administrator and you don’t have the permission to create or grant the application in Azure, or if your code is too complex or out of maintenance, and you don’t want to change anything in your source codes, then you can have a try with EA Oauth Service for Offic365. It provides an easy way for the legacy email application that doesn’t support OAUTH 2.0 to send and retrieve email from Office 365 without changing any codes. SMTP, POP, IMAP and SSL/TLS protocols are supported.
Appendix
- Send Email in C# - Tutorial
- EASendMail SMTP Component SDK
- Process Bounced Email (Non-Delivery Report) and Email Tracking
- Bulk Email Sender Guidelines
- Work with Email Queue
Comments
If you have any comments or questions about above example codes, please click here to add your comments.
