
DKIM in Exchange Server 2003 - Tutorial
Exchange Server 2003 is a common Windows email server. DKIM is a method for associating a domain name to an email message, thereby allowing email sender claims some responsibility for the email. In this tutorial, I will introduce how to add DKIM signature to outgoing emails in Exchange Server 2003. This tutorial is also suitable for Exchange Server 2000.
Sections:
- How DKIM works?
- Install DKIM in Exchange Server 2003
- Create DKIM for domain
- DKIM parameters
- Verify DKIM installation
- Deploy DKIM public key
- Test DKIM public key
- Test DKIM
- DKIM troubleshooting
- Deploy DKIM on multiple servers
- DKIM selector
- Import/Export private key in Pkcs8 format
- Using DKIM Sender Rule
- Appendix: SPF, DMARC, PowerShell and .NET SDK
- Free Email Support
How DKIM works?
DKIM combines of a public key cryptography and a DNS to provide credible domain-level authentication for email.
When an email claims to originate from a certain domain, DKIM provides a mechanism by which the recipient system can credibly determine that the email did in fact originate from a person or system authorized to send email for that domain.
Therefore, to sign an email with DKIM in Exchange Server, you MUST have a private key/public key pair for email signing. The work flow is illustrated as follows:
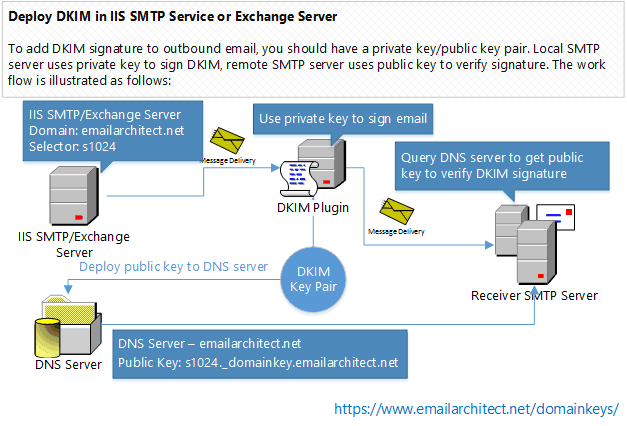
Because DKIM signer uses private key to sign the email, recipient system uses public key to verify the signature, therefore, if signer doesn’t expose the private key to third-party, the DKIM signature cannot be faked.
Install DKIM in Exchange Server 2003
To enable DKIM signature in Exchange 2003, you should download the DKIM Installer and install it on your server at first.
Note
Exchange Server on Multiple Servers
If you installed Exchange Server 2003/2000 on multiple servers, you don’t have to install DKIM plugin on every server. You just need to install DKIM plugin on Exchange front-end server.
Double click installer file and the installation will be executed automatically. Installer requires Exchange server to be installed. If no IIS SMTP Service or Exchange Server is detected in your operation system, the installer only installs DKIM management tool.
After the installation is complete, click “DKIM Plugin Manager” from “Windows Start menu” -> “All Programs” -> “EA DKIM for IIS SMTP and Exchange Server” to begin the setup.
Important
After the installation is complete, I strongly suggest that you check “IIS Admin” and “Simple Mail Transfer Protocol (SMTP)”
in Control Panel -> Administrative Tools -> Services, and check if those services are running,
if those service are not running, please start it.
Create DKIM for domain
Click Domainkeys/DKIM in Manager and click New to create a new domain DKIM signature.
DKIM signature is based on the domain of sender email address.
It is nothing about the server name.
For example, if you want to sign the email from *@emailarchitect.net, please input emailarchitect.net to Sender Domain.
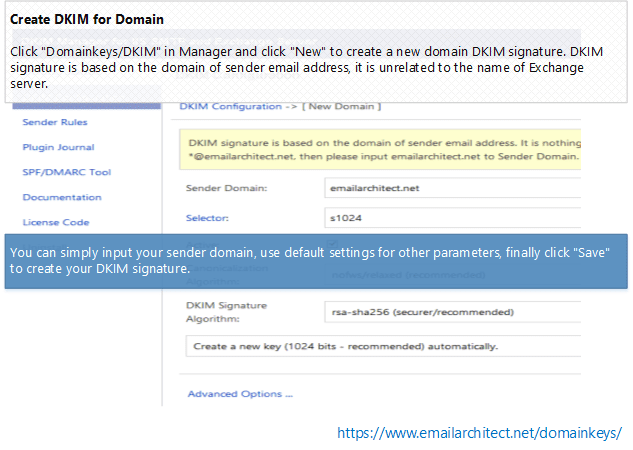
You can simply input your sender domain, use default settings for other parameters, finally click “Save” to create your DKIM signature.
DKIM parameters
Here is the detailed information about DKIM parameters:
| Parameter | Description |
| Sender Domain |
DKIM signature is based on the domain of sender email address. It is nothing about your server name. For example, if you want to sign the email from
|
| Selector |
To support multiple concurrent public keys per sending domain, the DNS namespace
is further subdivided with
To learn more detail, please refer to
Selector section. For a new domain, you can simply use the default value
|
| Active |
If you have this option unchecked, DKIM for this domain is disabled. |
| Canonicalization Algorithm | nofws/relaxed is recommended and it has better compatibility. |
| DKIM Signature Algorithm |
On Windows 2000/2003/XP, |
| Signed Headers | Specify what message headers should be signed.
|
| Sign only message headers | By default, DKIM signs entire body of message, however you can specify the maximum length of message body to sign. If your server relays message through a remote MTA, and this MTA adds disclaimer or changes email body content, I suggest that you use "sign a part of message" and set "Maximum length of message body to sign" to zero. |
| Sign system message (Exchange Server Only) |
By default, DKIM plugin doesn't sign system message, because those messages are supposed to transfer internally. However, if your server deliveries system message to internet, you should enable this option. |
| Sign internal MAPI message (Exchange Server Only) |
By default, DKIM plugin doesn't sign internal MAPI message to grow the performance, buf if you need to delivery MAPI message to internet (this is not default behavior of Exchange server), you should enable this option. |
| Sign delivery report |
This option specifies whether signing delivery report, default is true. |
| Sign only message headers for delivery report |
If this option is enabled, DKIM signs only message headers if the message is delivery report. |
| Wrap email address with <> in email header automatically (IIS SMTP Only) |
Sometimes original email header doesn't wrap email address with <>, however after DKIM is signed, some relay MTA may wrap email address automatically, this behavior corrupts the DKIM signature. This option can avoid the problem. You don't have to check this option (performance issue) except the relay MTA corrupted the signature. |
| Disabled recipients |
If message recipients contain the following email address, then disable DKIM signature.
Please separate multiple addresses by line-break. Wildcard ( |
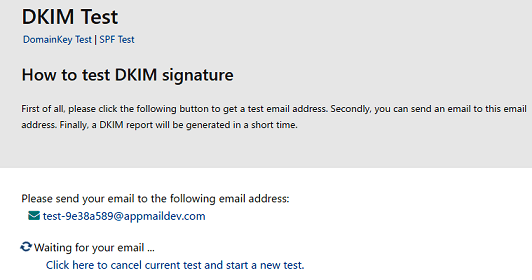
Verify DKIM installation
After you created DKIM for your domain, you can have a test with this online tools:
- First of all, open http://www.appmaildev.com/en/dkim
- Click “Next Step”, you will get a test email address like this:
- Finally you can send an email to this email address, please make sure your sender address is from your domain, otherwise, DKIM signature won’t be signed. A DKIM report will be generated in a short time.
You will get a report like this:
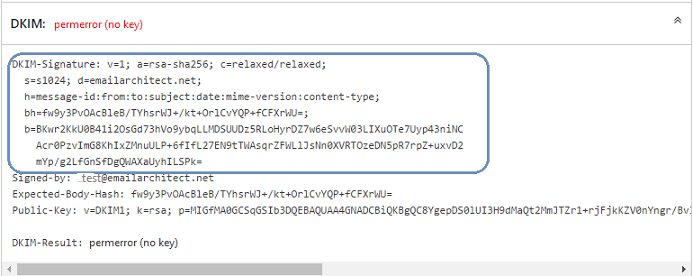
Because you didn’t deploy DKIM public key to DNS server, so you will get an error about "no key". But if there is a
header named “DKIM-Signature” in the report, that means DKIM signature is added to your email.
Now we need to deploy DKIM public key to domain DNS server.
Note
If there is no “DKIM-Signature” header in the report, please go to DKIM Troubleshooting
Deploy DKIM public key
As I introduced How DKIM works?, the recipient mail system need to query public key to verify DKIM signature. So we need to deploy DKIM public key to domain DNS server, then recipient system can query it by DNS server. Now we get back to DKIM manager and select your domain and click “Export Public Key”:
A dialog box will pop up and display a Public Key and a TXT record for deployment in your DNS server.
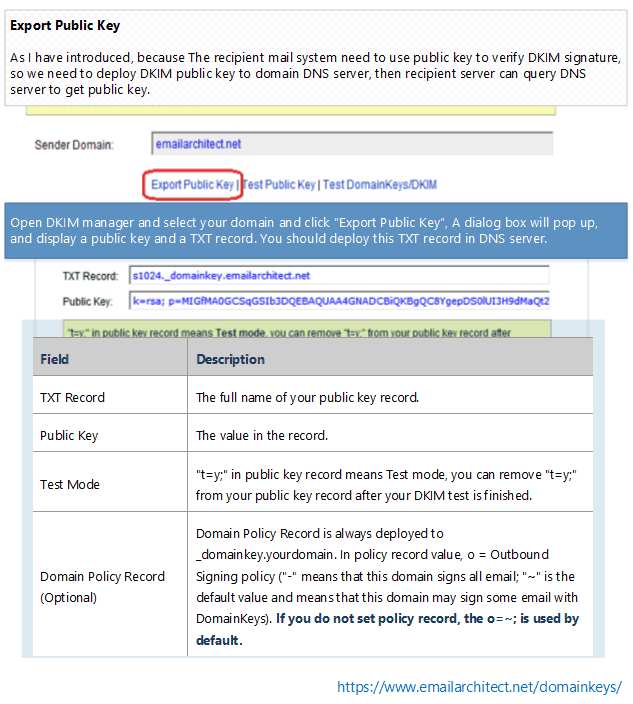
Here is record detailed information:
| Field | Description |
| TXT Record | The full name of your public key record. |
| Public Key | The value in the TXT record. |
| Test Mode |
|
| Domain Policy Record (Optional) |
Domain Policy Record is always deployed to _domainkey.yourdomain. In policy record value, o = Outbound Signing policy ("-" means that this domain signs all email; "~" is the default value and means that this domain may sign some email with DomainKeys).
If you do not set policy record, the |
Deploy DKIM public key TXT record in Windows DNS Server
If your domain is hosted by Windows DNS Server in local LAN. After you added a domain in DKIM Plugin Manager, you can select the domain and click “Deploy Key”, input your DNS server address and choose the DNS zone, the public key will be deployed to DNS server automatically.
If your domain is not hosted by Windows DNS server in local LAN, or it is failed by Deploy Key in DKIM manager, please deploy public key manually as follows:
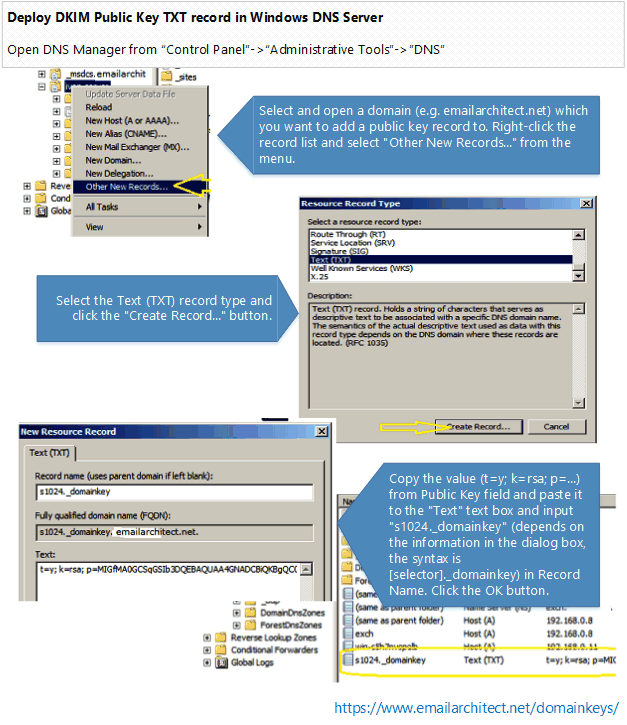
- Select and open a domain (e.g. emailarchitect.net) which you want to add a public key record to. Right-click the record list and select “Other New Records…” from the menu.
- Select the Text (TXT) record type and click the “Create Record…” button.
- Copy the value (
v=DKIM1; k=rsa; p=...) from Public Key field and paste it to the “Text” text box and inputs1024._domainkey(depends on the information in the dialog box, the syntax is[selector]._domainkey) in Record Name. Click the OK button.
Note
Windows 2000 DNS Server
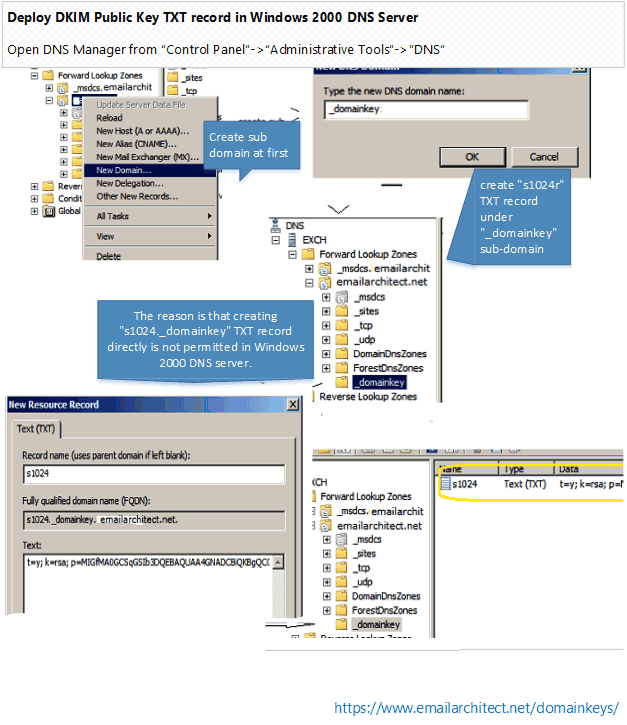
If you’re using Windows 2000 DNS server, you should create _domainkey domain under
your domain at the beginning, and then create s1024 TXT record under _domainkey sub-domain.
The reason is that creating s1024._domainkey TXT record directly is not permitted in Windows
2000 DNS server.
Deploy DKIM public key TXT record in Network Solutions
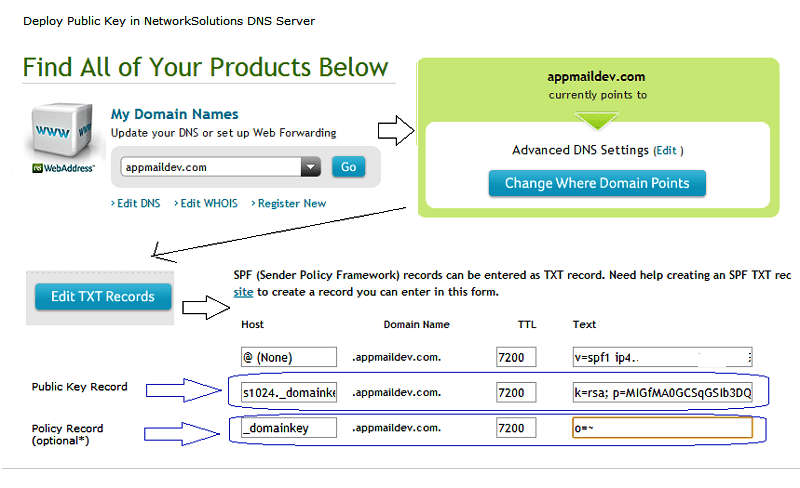
If your domain is hosted by www.networksolutions.com, you can deploy your public
key like this:
- Select your domain.
- Select the “Edit TXT Record”.
- Copy the value (
v=DKIM1; k=rsa; p=...) from Public Key field and paste it to the “Text” text box and inputs1024._domainkey(depends on the information in the dialog box, the syntax is[selector]._domainkey) in Host. Click the “Continue” button.
Deploy DKIM public key TXT record in GoDaddy
If your domain is hosted by GoDaddy, you can deploy your public key like this:
- Select your domain -> “Manage DNS”.
- Select the Records -> “Add”.
- Select Type as “TXT”, Copy the value (
v=DKIM1; k=rsa; p=...) from Public Key field and paste it to the “TXT Value” text box and inputs1024._domainkey(depends on the information in the dialog box, the syntax is[selector]._domainkey) in Host. Click the “Continue” button.
Deploy public key TXT record in BIND server or DNS zone file
If your domain is hosted by Bind DNS server, you can add DKIM public key record like this: locate your domain’s zone file and open it with your preferred editor, then add the following content:
; DKIM public key record
s1024._domainkey.yourdomain.com.      IN     TXT    "v=DKIM1; k=rsa;p=MIGfMA0GCS....W7QwIDAQAB"
Deploy DKIM public key TXT record in other DNS servers
If your domain is hosted by other ISP, as most ISP provide DNS Web administration like “Network Solutions” or “GoDaddy” do, you can refer to Deploy Public Key TXT in Network Solutions DNS server section and deploy your public key in your ISP DNS Web administrative tool.
If you are not DNS server administrator, or your domain is hosted by other DNS server, please send the information in dialog box -> DNS Public Deployment to your domain DNS server administrator for assistant.
2048 Public key deployment
Because single DNS TXT record is limited to 255 characters, key pair with 2048 length exceeds the limit. You need to separate public key to 2-3 parts in DNS server.
Important
Because many DNS providers don’t support TXT record more than 255 characters, so using 1024 public key is recommended.
In Windows DNS Server, you should use line-break to separate the long public key
v=DKIM1; k=rsa; p=k=rsa; p=MIGfMA0GCSqGSIb3DQEBAQUAA4GNADCBiQKBgQC8YgepDS0lUI3H9dMaQt2Mm...
JTZr1+rjFjkKZV0nYngr/Bv3G1KbqFfp4yDFMUODf9Q/m3OO03GO204kc4CygBQzCKe8BZqzDfHN5rOG...;
In BIND Server or DNS Zone file, you should deploy key as follows:
s1024._domainkey.yourdomain.com.    IN      TXT     ("v=DKIM1; k=rsa; p=MIIBIjANBgkqG9w0BAQEFAAOCAQ8AMIIBCg..."
                                    "2LjDmbvj6V82iSnW3lAg3Sr212oKm7iFAT6diDvItD5botwDpk9jrRFxi...")

;OR

s1024._domainkey.yourdomain.com.    IN      TXT     "v=DKIM1; k=rsa; p=MIIBIjANhkiG9w..." "2LjDmbvj6iSnW3g3Sr212o4..."
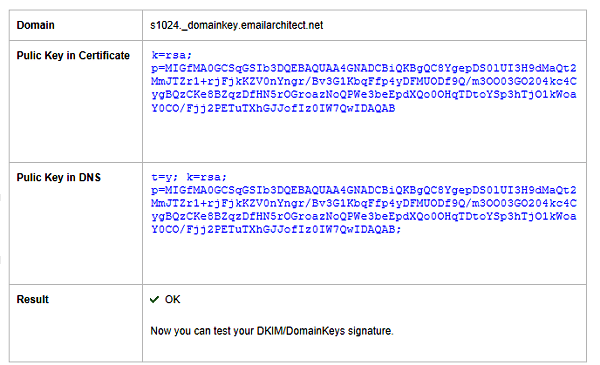
Test DKIM public key
After the Public Key in DNS server is deployed, you can click “Test Public Key” in EA DomainKeys/DKIM Manager to verify the public key. It will tell if your public key is deployed correctly. After your public key is ok, you can go to Test DKIM Signature .
You can also use nslookup command to test your public key like this:
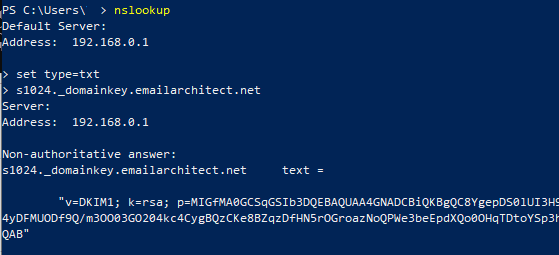
Windows Start menu->input:
nslookup
set type=txt
s1024._domainkey.yourdomain
If your key is deployed successfully, it should return something like above screenshot.
Test DKIM
Now you can have a test with this online tools again:
- First of all, open http://www.appmaildev.com/en/dkim
- Click “Next Step”, you will get a test email address.
- Finally you can send an email to this email address, please make sure your sender address is belong to this domain, otherwise, DKIM signature won’t be signed. A DKIM report will be generated in a short time.
You will get a report like this:
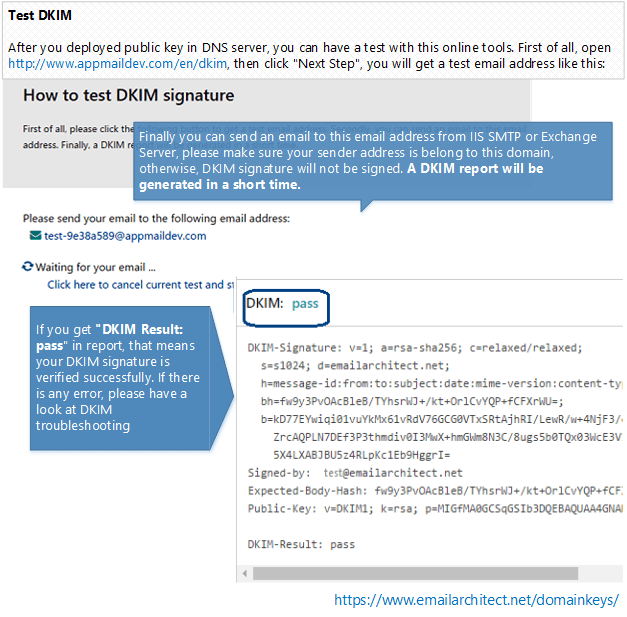
If you get “DKIM Result: pass” in report email, that means your DKIM signature is verified successfully. If there is any error, please have a look at following section
DKIM troubleshooting
If your email doesn’t have DKIM-Signature header after you set the DKIM, you should check the followings:
- Check your email sender, please make sure your from
address is
*@yourdomain, and you have set the domain in DKIM. As DKIM signature is based on the email sender, if the sender domain is not set in DKIM Manager, the email won’t be signed. - Check your log file for any error message.
- If there is error logged, please contact support@emailarchitect.net for assistance.
- If there is no error in the log file, you need to verify the DKIM installation.
Installation permission
When you install DKIM on Exchange Server 2003, please make sure you are using “Domain Administrator” user to run the installer.
Verify IIS SMTP/Exchange 2000/2003 installation
If you installed EA DomainKeys on Exchange 2003, please
open DOS prompt, and change directory to EA DomainKeys installation path\installer.
cscript smtpregex.vbs /enum

Press enter.
Please check if there is EA DomainKeys Sink installed in the output.
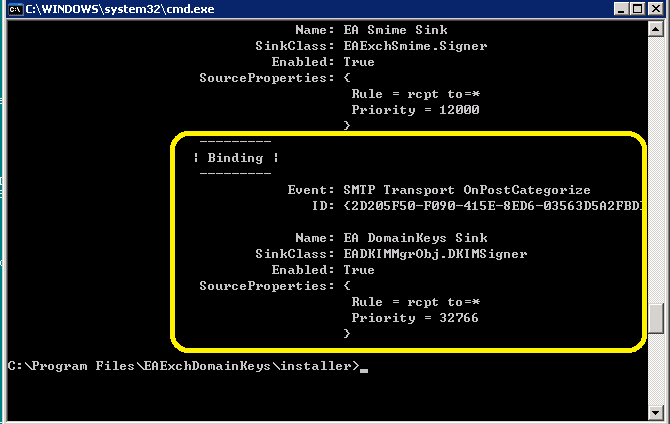
If there is no EA DomainKeys Agent, you can re-run the installer directly (do not uninstall) to fix this problem. You can also contact support@emailarchitect.net for assistance.
wrong body hash
It is likely that the MTA changed email content (disclaimer software or anti-virus software).
Please go to DKIM setting, check Sign a part of message and set Maximum length of message body to sign to zero,
then try it again.
Failed to verify DKIM signature (wrong body hash, bad signature)
If your email has DKIM-Signature header, but it couldn’t be verified by this online tool, you should go to DKIM setting and test your public key again to make sure your public key is ok. If your public key is ok, please contact support@emailarchitect.net for assistance.
Now Exchange Server 2003 can add DKIM signature to outgoing emails from your domain. If you want to send email from other domain, you can simply add the domain from DKIM manager.
In the following section, I will introduce some advanced DKIM features.
Deploy DKIM on multiple servers
You can synchronize the configuration files on multiple servers as follows:
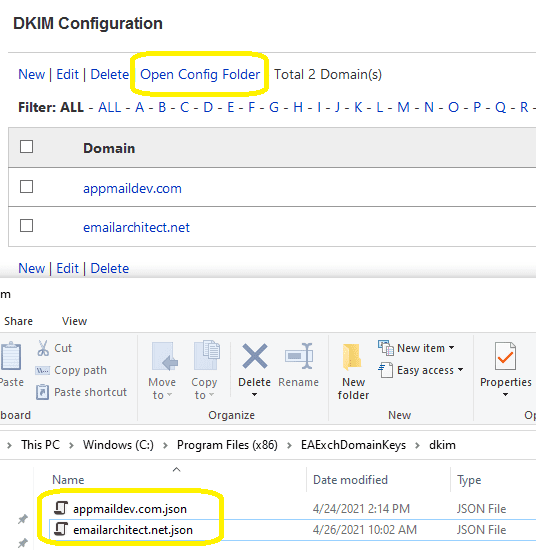
- Install EA DomainKeys on the first server, and create the domain(s),
then open
Dkim Config FolderbyDKIM manager->DKIM->Open Config Folder. You can find[domain].jsonfiles. - Install EA DomainKeys on other servers, open
Dkim Config Folder, and copy[domain].jsonfiles from first server to other servers’DKIM Config Folder.
Now, all of your servers have the same configuration (private/public key pair) for your domain.
To learn more detail, please refer to DKIM Selector section.
DKIM selector
To support multiple concurrent public keys per sending domain, the DNS namespace
is further subdivided with selectors. Selectors are arbitrary names below the
_domainkey, namespace. For example, selectors may indicate the names of your
server locations (e.g., mta1, mta2, and mta2), the signing date (e.g., january2005,
february2005, etc.), or even the individual user.
The most important thing is: selector indicates your DKIM public key location.
For example:
- If your domain selector is:
s1024, your public key record should bes1024._domainkey.yourdomain; - If your domain selector is:
mta1, your public key record should bemta1._domainkey.yourdomain.
DKIM selector usage
If you have only one server and you only set the DKIM/DomainKeys on this server,
you can give your selector any name. For example: your domain name is: emailarchitect.net
and your selector is: s1024, you should deploy your public key to s1024._domainkey.emailarchitect.net.
After the receiver received your email, the receiver can query the public key from
s1024._domainkey.emailarchitect.net to verify your DomainKeys/DKIM signature.
Note
If you have only one server, you can skip the followng sections.
Using a single DKIM selector with the same domain on multiple Exchange servers
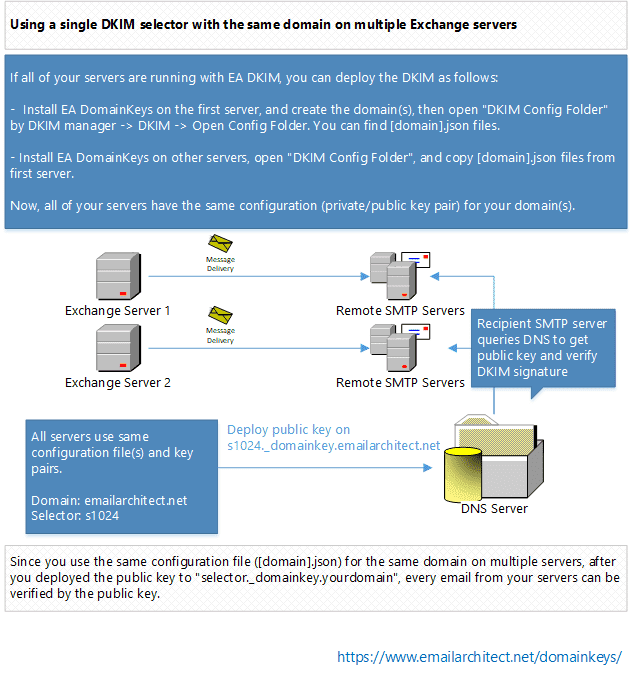
If all of your servers are running with EA DomainKeys, you should deploy the DKIM as follows:
- Install EA DomainKeys on the first server, and create the domain(s),
then open
"Dkim Config Folder"byDKIM manager->DKIM->Open Config Folder. You can find [domain].json files. - Install EA DomainKeys on other servers, open
"Dkim Config Folder", and copy[domain].jsonfiles from first server to other servers’"Dkim Config Folder".
Now, all of your servers have the same configuration (private/public key pair) for your domain.
Since you use the same configuration file ([domain].json) for the same domain on multiple servers,
after you deployed the public key to selector._domainkey.yourdomain,
every email from your servers can be verified by the public key.
Using multiple DKIM selectors with the same domain on multiple Exchange servers
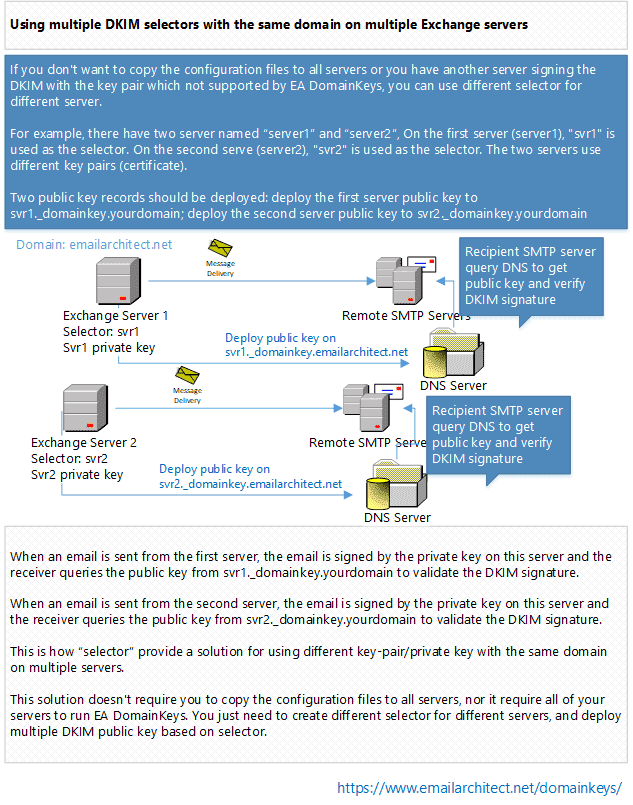
If you don’t want to copy the configuration files to all servers or you have another server signing the DomainKeys/DKIM with the key pair/private key not supported by EA DomainKeys, you can use different selector for different server.
For example, there have two server named server1 and server2, On the first server (server1),
svr1 is used as the selector. On the second serve (server2), svr2 is used
as the selector. The two servers use different key pairs (private key).
Two public key records should be deployed: deploy the first server public key
to svr1._domainkey.yourdomain; deploy the second server public key to svr2._domainkey.yourdomain.
- When an email is sent from the first server, the email is signed by the
key pair (private key) on this server and the receiver will query the public key
from
svr1._domainkey.yourdomainto validate the DKIM signature. - When an email is sent from the second server, the email will be signed by the
key pair (private key) on this server and the receiver will query the public key
from
svr2._domainkey.yourdomainto validate the DKIM signature.
This is how selector provide a solution for using different key-pair/private key with the
same domain on multiple servers.
This solution doesn’t require you to copy the configuration files to all servers, nor it require all of your servers to run EA DomainKeys. You just need to create different selector for different servers, and deploy multiple public key based on selector.
Import/Export private key in Pkcs8 format
Most DKIM signers use plain text private key in PKCS8 format.
To synchronize the private key in different software/signer,
you can import or export pkcs8 private key
in DKIM manager -> your domain - > Private Key Management.
Finally, I will introduce how to sign DKIM onbehalf customer domain.
Using DKIM Sender Rule
Sometimes you need to send an email with sender address not hosted by your server. In this case, you cannot set DKIM signature for such email, as you don’t have permission to deploy the DKIM public key to the domain not hosted by your DNS server.
The typical usage is email forwarding. For example, one remote email is delivered to your local user mailbox, but your local user set email forwarding to another remote address. With sender rule, you can re-sign DKIM by your domain and also change MAIL FROM to comply with SPF record.
Note
If you don’t send email from outside email address, or you don’t need to sign the DKIM for those emails, you can simply ignore this topic.
How to use Sender Rule
Here is the scenario. You own a domain emailarchitect.net and
you have DKIM/DomainKeys for emailarchitect.net
set on your server. There is no problem when you send emails with sender *@emailarchitect.net,
the email will be signed correctly.
At the same time, your customer requested you to send emails with
sender *@adminsystem.com and sign the DKIM/DomainKeys signature for outgoing emails. As adminsystem.com is
your customer domain and you don’t have permission to deploy the public key to
adminsystem.com DNS server, you have to use sender rule.

To solve the problem, you can add a sender rule like the above screenshot. This rule
means “If from addess is *@adminsystem.com, then add a sender header (Sender: testuser@emailarchitect.net)
to the message”. And the email will be signed by emailarchitect.net based on the
sender header.
With the above sender rule, the email will be signed by DomainKeys/DKIM
signature with domain emailarchitect.net. And the recipient email client will display: From: testuser@emailarchitect.net
on behalf of *@adminsystem.com.
Note
If your customer can deploy public key record, then you don’t need to use Sender Rule.
Use Reply-To header instead of Sender header
If you also check “Use Reply-To header instead of Sender header”, and the recipient email client will display:
Reply-To: *@adminsystem.com (original sender address)
From: testuser@emailarchitect.net
We strongly suggest that you use this option for anti-spam policy.
DKIM priority
DKIM setting has higher priority than sender rule, that means if DKIM setting is found for the email, this email will not be changed by sender rule.
For example, if you set emailarchitect.net in DKIM setting, and add a rule like this:
if From contains *@emailarchitect.net,
    then ...
Sender rule won’t change the email sender from *@emailarchitect.net,
the email will be simply signed by DKIM with emailarchitect.net.
Appendix: SPF, DMARC, PowerShell and .NET SDK
C#, VB.NET can be used to manage DKIM programmingly.
You can find the full sample project in DKIM installation path\DkimConfigSample.
Free Email Support
Not enough? Please contact our technical support team.
Remarks
We usually reply emails within 24hours. The reason for getting no response is likely that your smtp server bounced our reply. In this case, please try to use another email address to contact us. Your Gmail, Hotmail or Office 365 email account is recommended.