
Register azure application for Office 365 OAUTH and add SMTP/POP/IMAP service permission to specific user - Tutorial
Because Office 365 has disabled basic authentication in SMTP/POP/IMAP services, You have to use modern authentication (OAUTH) to login Office 365 SMTP/POP/IMAP service.
To use OAUTH, the access token is required. There are two ways to retrieve the access token from Microsoft server:
- User login the account by web browser, the application uses the returned authorization code to request the access token. This way requires user interactive attending, it is not suitable for server-side application.
- Grant admin consent to the application, the application uses the client secret to request the access token directly. This way doesn’t require user attending, it is suitable for background service.
This tutorial introduces how to register application for background service in Azure Portal,
then assign the SMTP/POP/IMAP API permission to the application and add the access right to mailbox of specific user.
Register the application in Azure Portal
Sign in to the Azure Portal using the Microsoft account of the Office 365 administrator.
If your account gives you access to more than one tenant, select your account in the top right corner, and set your portal session to the Azure AD tenant that you want.
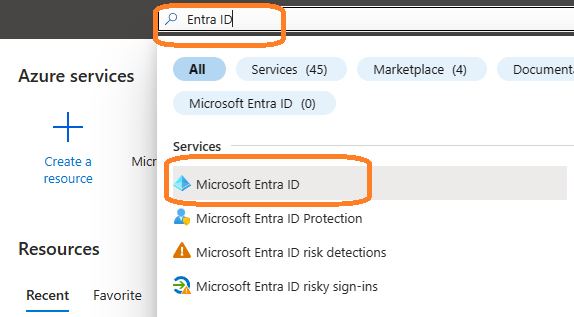
Search Microsoft Entra ID (old name “Azure Active Directory”) and go to this service:
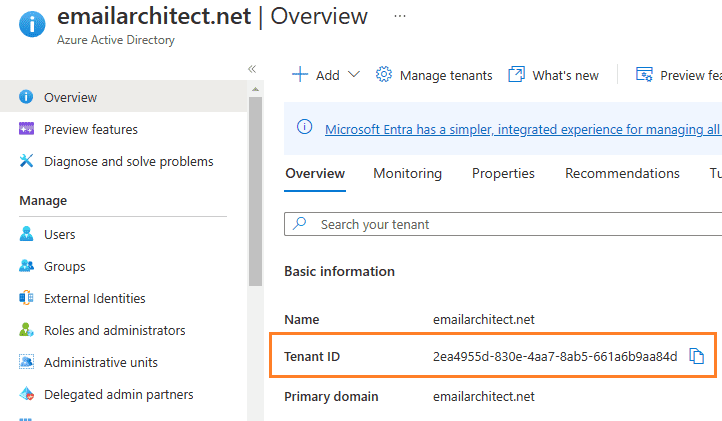
Find the tenant id
You can see the overview of the directory and the tenant id which is a required parameter for requesting access token.
Register application
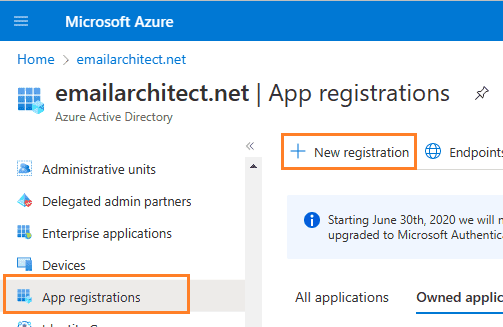
In the left-hand navigation pane, select the Microsoft Entra ID service, and then select Manage -> App registrations -> New registration.
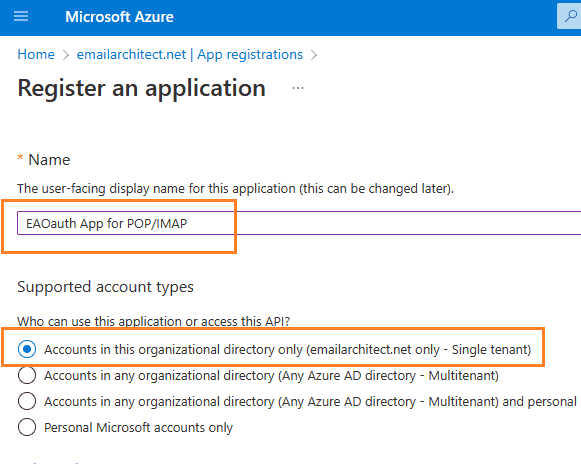
Input a name to to register the application:
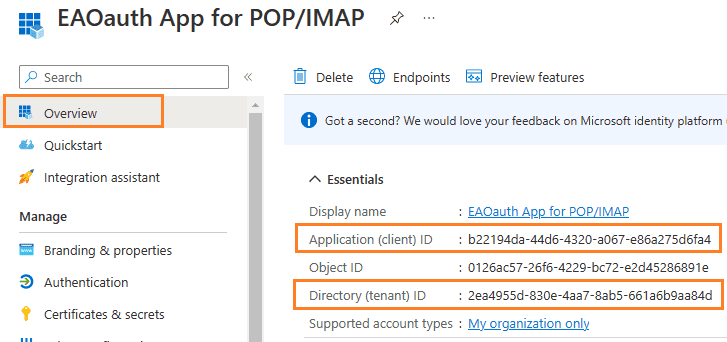
Find the application id (client id)
After the application is registered, you can click Overview to find the client id and tenant id:
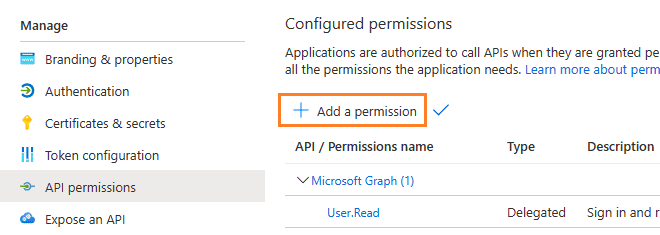
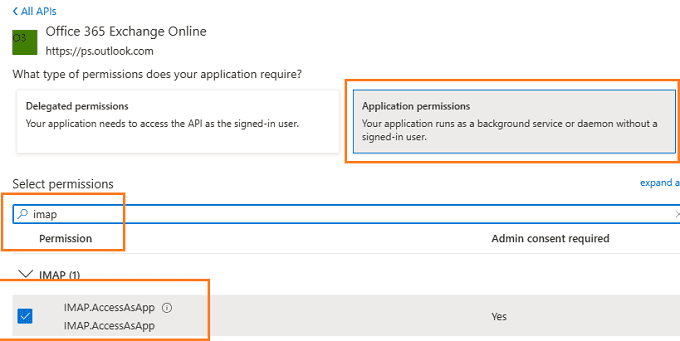
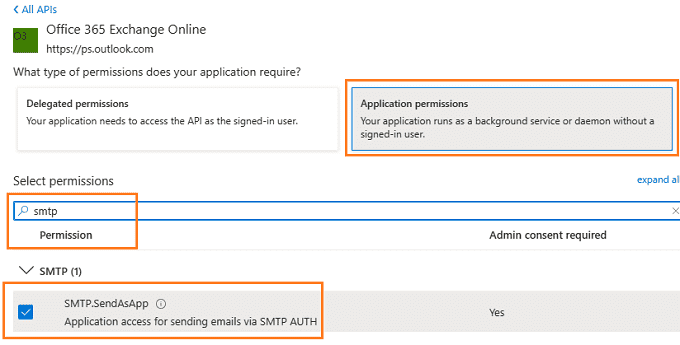
Assign API permission
Now you need to assign API permission to the application by clicking Manage -> API Permission -> Add a permission
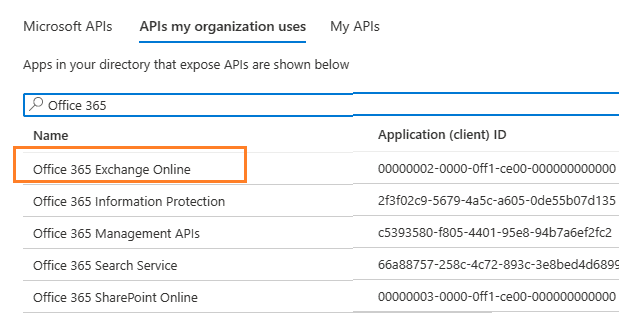
Go to APIs in my organization uses ->
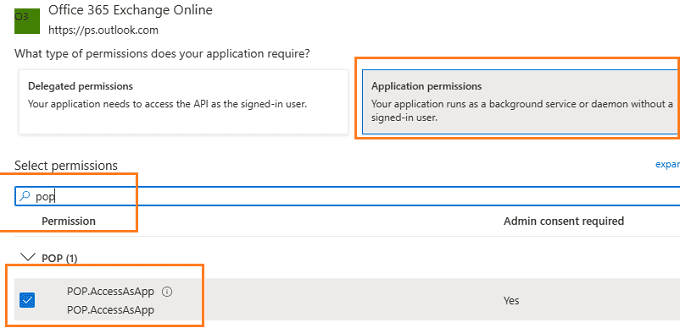
Office 365 Exchange Online -> Application Permission ->
Add POP.AccessAsApp permission
Add IMAP.AccessAsApp permission
Add SMTP.AccessAsApp permission
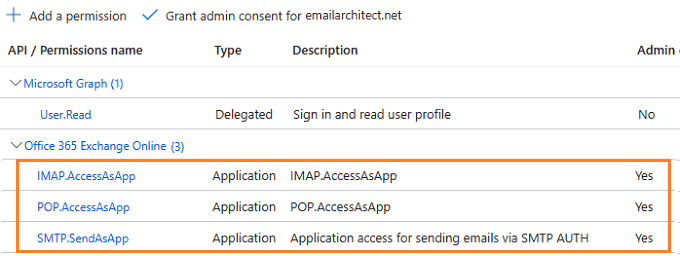
Complete permissions list
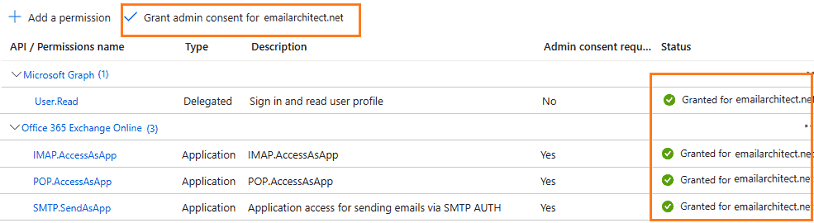
Grant admin consent in API permission
To use the application to access user mailbox in Office365 domain, you should grant admin consent by Office365 domain administrator.
In Manage -> API Permission -> Click grant admin consent for ... to grant admin consent to the application.
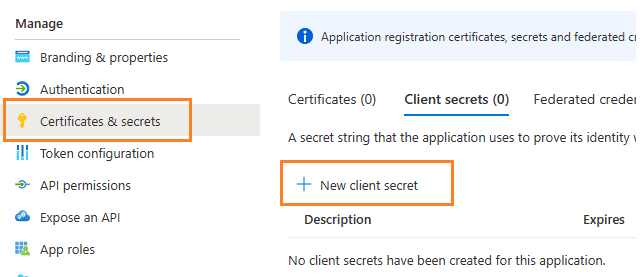
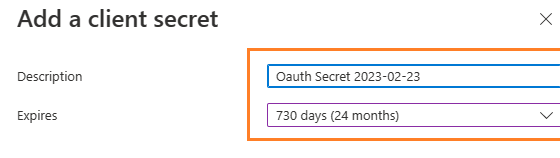
Create client secret
Now we need to create a client secret for the application,
click Certificates and secrets -> client secrets and add a new client secret.
Store client secret value
After client secret is created, store the client secret value value to somewhere. It is another required parameter for requesting access token.

Important
Please store client secret value by yourself, because it is hidden when you view it at next time.
Register SMTP/POP/IMAP service principals in Exchange
Now the application is consented to by the tenant admin. To access SMTP/POP/IMAP service, the tenant admin still need to register your application as service principal in Exchange via Exchange Online PowerShell. This is enabled by the New-ServicePrincipal cmdlet.
New-ServicePrincipal -AppId <APPLICATION_ID> -ServiceId <OBJECT_ID>
Find APPLICATION_ID and OBJECT_ID
You should find your APPLICATION_ID and OBJECT_ID before running above cmdlet.
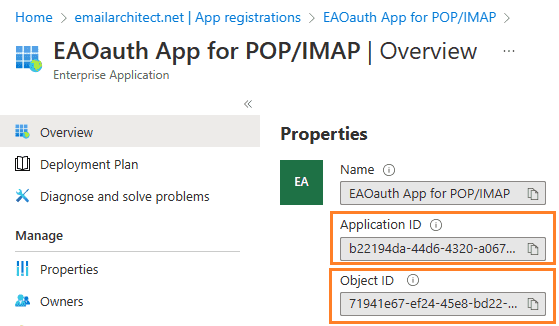
Go to Overview -> Managed application in local directory:
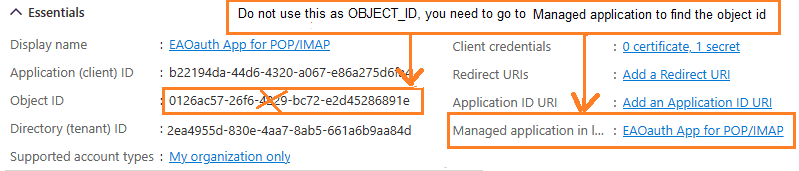
After you clicked your application name in Managed application in l...,
you can see Application ID and Object ID for New-ServicePrincipal cmdlet.
Open Exchange Online PowerShell
Now you need to open Exchange Online PowerShell to run the cmdlet. If you have not installed the module, you can use the Install-Module cmdlet to install the module from the PowerShell Gallery.
Install-Module -Name ExchangeOnlineManagement
After you’ve installed the module, open a PowerShell window and load the module by running the following command:
Import-Module ExchangeOnlineManagement
Connect-ExchangeOnline -UserPrincipalName "admin@yourdomain.onmicrosoft.com"
Create service principal
After Exchange Online PowerShell is connected successfully, run the following cmdlet to create a new service principal:
New-ServicePrincipal -AppId "b22194da-44d6-4320-a067-e86a275d6fa4" -ServiceId "71941e67-ef24-45e8-bd22-dfd53790bb77"
Query service principal
After you create the service principal, you can query it by:
Get-ServicePrincipal
Add permission to specific user
You can now add the specific mailboxes in the tenant that will be allowed to be access by your application. This is done with the Add-MailboxPermission cmdlet.
Add-MailboxPermission -Identity <mailboxIdParameter> -User <SecurityPrincipalIdParameter|OBJECT_ID> -AccessRights <MailboxRights[]>
For example:
Add-MailboxPermission -Identity "grant-test@emailarchitect.net" -User "71941e67-ef24-45e8-bd22-dfd53790bb77" -AccessRights FullAccess
Query permission
You can also query the permission by:
Get-MailboxPermission -Identity "grant-test@emailarchitect.net"
Client id (application id), client secret value and tenant
Now you can use client id, client secret value and tenant to request access token from Microsoft server, then
the access token can be used to access Office 365 SMTP/POP/IMAP service by OAUTH.
Here is the C# example codes that demonstrate how to request access token by client secret:
using System;
using System.Text;
using System.IO;
using System.Net;
using System.Globalization;

static void _requestToken(string uri, string requestData)
{
    string client_id = "b22194da-44d6-4320-a067-e86a275d6fa4";
    string client_secret = "VTO8Q~eo0JCXc291jcM4wnhZ_GXyKMu.";

    string tenant = "2ea4955d-830e-4aa7-8ab5-661a6b9aa84d";

    string scope = "https://outlook.office365.com/.default";

    string requestData =
        string.Format("client_id={0}&client_secret={1}&scope={2}&grant_type=client_credentials",
            client_id, client_secret, scope);

    string tokenUri = string.Format("https://login.microsoftonline.com/{0}/oauth2/v2.0/token", tenant);

    HttpWebRequest httpRequest = WebRequest.Create(tokenUri) as HttpWebRequest;
    httpRequest.Method = "POST";
    httpRequest.ContentType = "application/x-www-form-urlencoded";

    using (Stream requestStream = httpRequest.GetRequestStream())
    {
        byte[] requestBuffer = Encoding.UTF8.GetBytes(requestData);
        requestStream.Write(requestBuffer, 0, requestBuffer.Length);
        requestStream.Close();
    }

    try
    {
        HttpWebResponse httpResponse = httpRequest.GetResponse() as HttpWebResponse;
        using (StreamReader reader = new StreamReader(httpResponse.GetResponseStream()))
        {
            // reads response body
            string responseText = reader.ReadToEnd();
            // output the response text which includes the access token.
            Console.WriteLine(responseText);
        }
    }
    catch (WebException ex)
    {
        Console.WriteLine(ex.Message);

        if (ex.Status == WebExceptionStatus.ProtocolError)
        {
            // get more detail from the response stream.
            var response = ex.Response as HttpWebResponse;
            if (response != null)
            {
                Console.WriteLine("HTTP: " + response.StatusCode);
                using (StreamReader reader = new StreamReader(response.GetResponseStream()))
                {
                    // reads response body
                    string responseText = reader.ReadToEnd();
                    Console.WriteLine(responseText);
                }
            }
        }
    }
}
Use client secret in third-party application
You can also use the client id, client secret value and tenant in third-party application that supports OAUTH.
If you have a legacy email application doesn’t support OAUTH, the following third-party application can use the
client id, client secret value and tenant to help your application to connect Office 365.
Free Email Support
Not enough? Please contact our technical support team.
Remarks
We usually reply emails within 24hours. The reason for getting no response is likely that your SMTP server bounced our reply. In this case, please try to use another email address to contact us. Your Gmail, Hotmail or Office 365 email account is recommended.